We believe it is very important that you review and confirm that you have read our Privacy Policy to ensure that you are
aware of and agree to our collection and use of your Personal Data. Click here for Privacy Policy .
This website uses cookies to improve your experience .
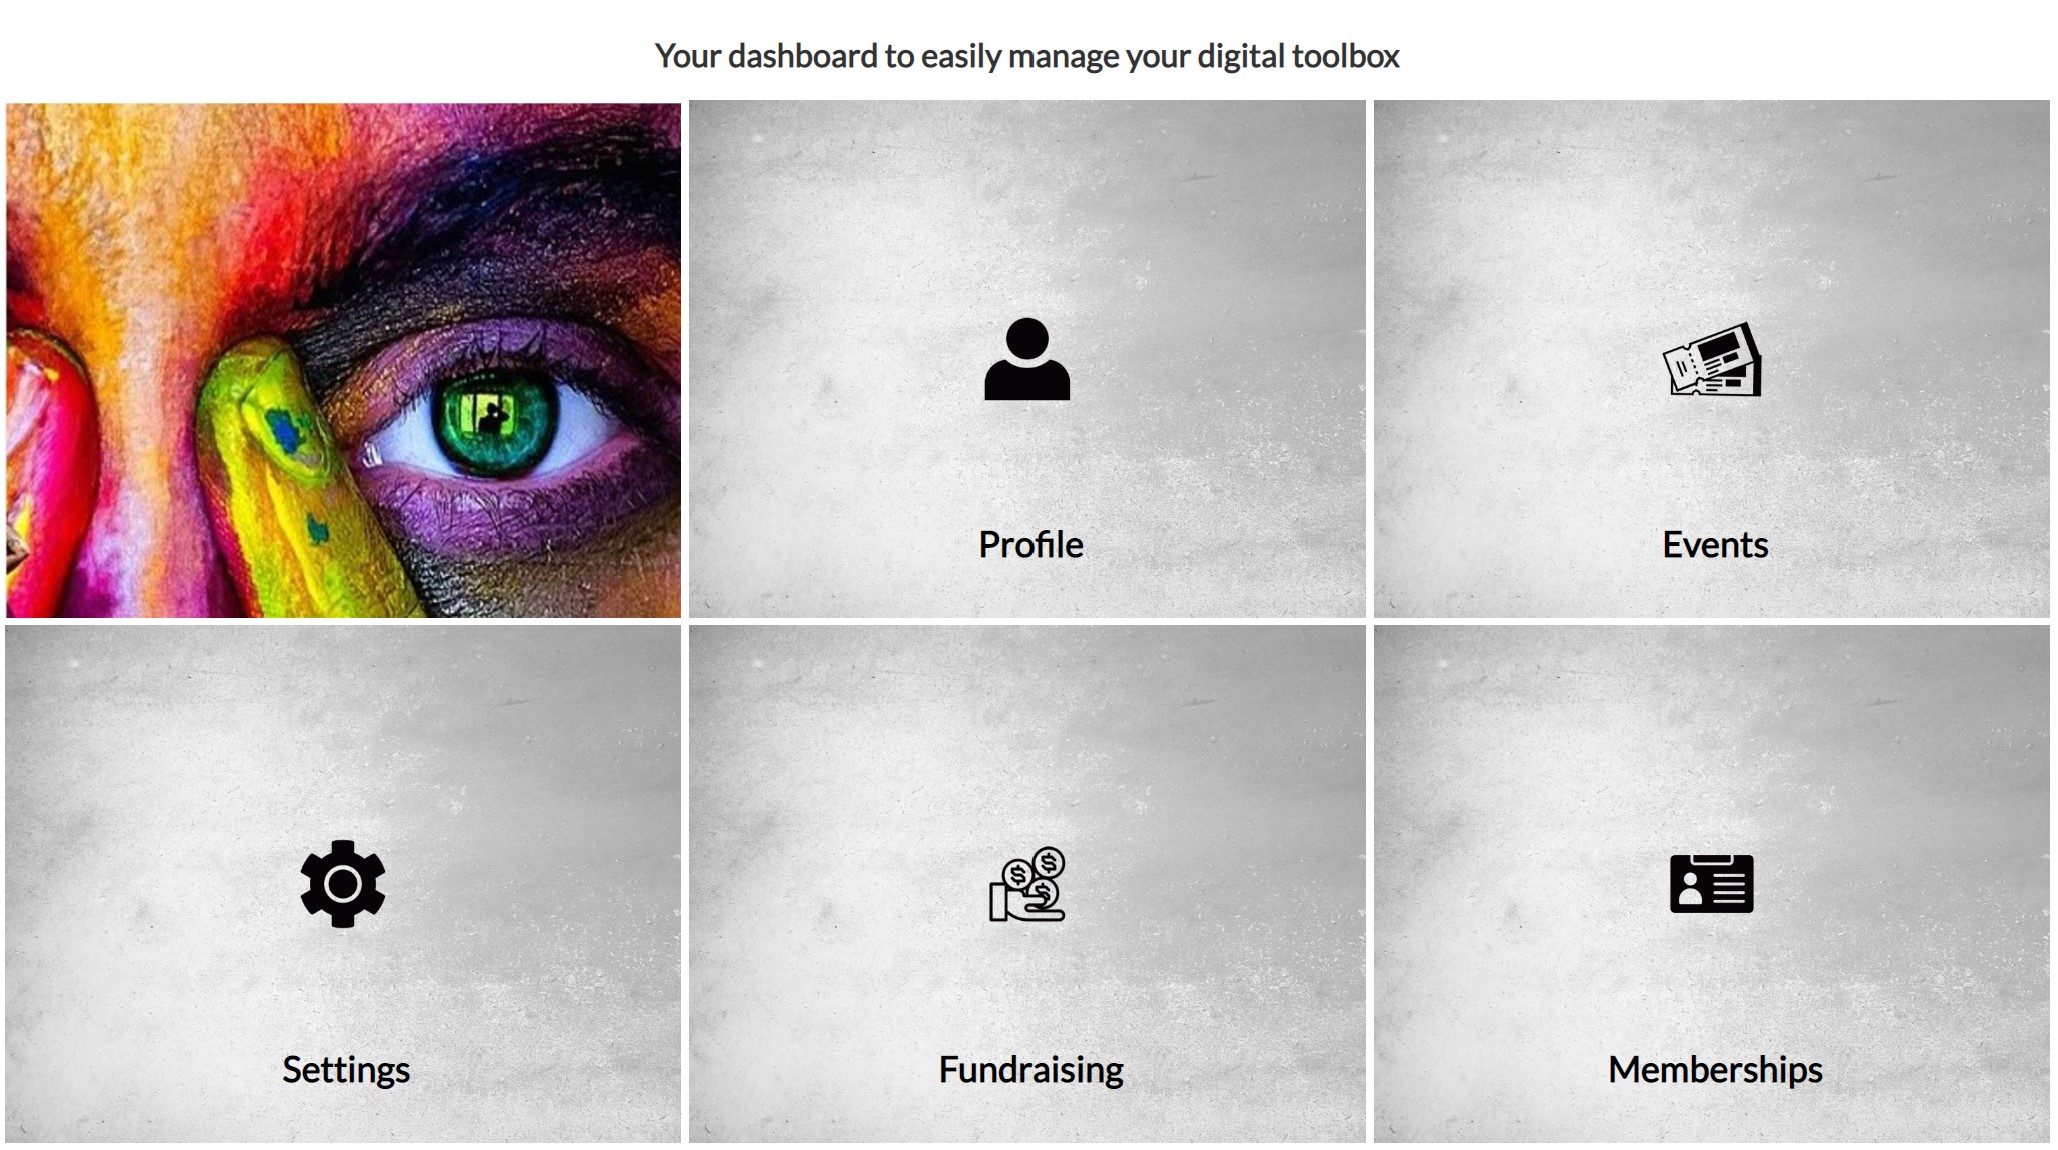
VIBRNZ EVENT MANAGEMENT TOOLS
Don't just create an event, create an experience!
Vibrnz is a digital solutions platform. Our event management tools help you manage your events end to end. These events could be concerts, fundraisers, galas, classes, workshops, or any other type of event. Our tools provide end to end management starting from creating and listing the event, to ticketing and streaming the event. Explore how our tools can help you enhance the experience for your audience.
Get started with your first event in a few simple steps! Assuming that you have signed up and created an account on Vibrnz!
Step 1: Log into Vibrnz - Dashboard>>Events>>Create Event
Step 2: Edit form to create your event (Make sure your Vibrnz account is linked to Stripe - for Payment processing)
Step 3: Review and Publish
Step 4: Share the URL and QR code to start selling tickets
Events Dashboard>>Create Event
Once you click on "Create Event", you will go to the "Edit Event" Page. Enter your event information here.
Helpful tip: Before you start creating the event, it would be helpful to have a banner image ready. The ideal size of the banner is 1210 px by 500 px and is mandatory. Use the banner to create a good branding of your event. You can also add your event flier. It is optional but creates an impact.
BASIC DETAILS:
1. Event type - From the drop down menu choose your event type like concert, or a workshop. 2. Event topic - Here you select the topic of your event like music, or literary arts. 3. Event sub-topic - Once you select the event topic, you need to select a sub-topic. For e.g. if you choose music as your topic, a sub-topic could be alternative music. 4. Event name - Try to keep it brief, up-to 60 characters 5. Description - Describe your event so your guests understands what your event is all about. Keep it simple but let your guests know what will they experience at the event. 7. Event location - Choose whatever is applicable. Virtual, In-person or Hybrid. If you choose Virtual, you can add the streaming link to the venue location where the event will be broadcast. The link will be part of the order confirmation email received by the ticket buyer upon purchase of the ticket. In case of Hybrid event, the event is being held physically as well as streamed virtually for people who cannot attend in-person. In the event location, you will get the option of adding both your physical location and your virtual link.
9. Event time zone and schedule - Make sure you have the correct time zone based on where your event is being organized. Click on the button "Add date and time" to add the event start and end date and time. For recurring event, choose the recurring option. 8. Organizer details - Click on the "Add organizer" and fill up the details as requested. It is always helpful to have a Vibrnz profile for the host and the organization so your audience can click on the profile and get to learn more. To add website and social media links, click on "Add link". In the pop up, select from the drop down. For e.g. choose Facebook. Copy your Facebook link and paste it in the field next to drop down. Click on submit. Adding your social media and website links help your audience know more about you.
BANNER AND EVENT FLYER:
1. Banner or Cover photo - You can use this banner to create your branding. Just make sure that you follow the recommended size of 1400 by 458 px. 2. Event flier - This is optional but we would recommend you add it to the page to make a better impact. Ideal size would be 800 by 1000 px or 800 by 800 px
3. Add gallery - Display a gallery of images to showcase your upcoming event. Click on "Add images".
TICKETS:
In this section you can create tickets.
Paid tickets - Click on "Add paid ticket" to create tickets that have a charge. In the pop up, add the ticket name. Then add the quantity of tickets you expect to be sold. You can add multiple levels, with different pricing. For e.g. Regular, Early Bird, VIP, VVIP. Add description for each ticket level so your guests understand what each level stands for. If your event is looking for sponsorships, you can even creating various sponsorships as your ticket levels.
Free tickets - Tickets that have no cost. There is no service fee on free tickets. Click on "Add free ticket". In the pop up, add the ticket name. Like Event registration, or Early bird. Then add the quantity of tickets you expect to be sold.
Add-ons - Create ticket add-ons like Adults, Kids lunch, Veg, Non-veg, Parking etc. Click on Add-ons and follow the steps. To purchase add-ons, users have to purchase a ticket. The add-ons could be linked to a specific ticket. You can also create combos that allow you to limit add-on purchases based on ticket quantity.
Bundles - Create ticket bundles like Table of 10 to offer group discounts for special pricing. Click on Create Bundle and follow the instructions.
Please note: Once you publish the event, to change the pricing, and quantity of the tickets, you will go to the Event Dashboard, under upcoming events, go to your published event and click on Ticket settings as shown below:
Service fee - You have the option of passing on the service fee to the ticket buyer or absorbing it. Choose what is applicable to you.
Ticket sales start and end date (and time) - You can choose to start and end your ticket sales at a specific date and time. By default start date is the date the event is published and end date and time is when the event is scheduled to end. You have the option to display the sales end date.
Terms and Conditions - Provide any terms you have for your guests who buy your event ticktes. For e.g. No refunds etc.
FAQs - Any frequently asked questions
Book button - You can choose what text you want to display on the BOOK button - the button that your guests will click on to go to the checkout page and buy their tickets. Click on the option that best suits your event.
DONATIONS:
You can accept donations during a ticketed event. If you are organizing a fundraiser event, you can create tickets and add the option to donate. There are two ways you can display donation. One displays the donation button with pre-populated donation amounts and the second allows you to share your donation goal and display the amount raised to date.
You can modify the donation title on the checkout page by adding the text of your choice. By default the title says "Donation (optional)".
PARTICIPANT INFORMATION:
This section is to showcase the participants in the event. This is very helpful if the participants have a Vibrnz profile. Click on the button. In the pop up, type the participant name. If the participant has a Vibrnz profile you will see it in the drop down. Just choose from the drop down. If the participant does not have a Vibrnz profile, just type the name and press enter. Having a completed Vibrnz profile will help showcase the participant credentials to your audience.
SPONSORS/VENDORS:
Showcase your sponsors by using the "Add sponsors" button. Submit the sponsor details along with their logo and link to the sponsor website. You can also add vendors and showcase their logos.
PAYMENT SETTINGS:
Here you link your Vibrnz account with Stripe. In order to get your ticket sales proceeds directly to your bank account, link your Vibrnz account to Stripe. Stripe is a Global Payment Gateway. Once you set up your Stripe account and link it with Vibrnz, you will received the proceeds from the ticket sales based on the Stripe payment schedule you have set up.
PROMO CODES:
To incentivize your guests to buy tickets, you can make use of Promo codes. Just click on the button "Edit/View Promo/Discount Code" and generate a new code as you follow the instructions.
PRIVACY:
If you would like to keep your event unlisted, so only those who have the link can view the event, click on "Make the event private...". Or else Click on "Make the event public". In that case the event will show on Vibrnz under upcoming events under "Events".
Sensory Friendly - Check this option if your event is autism friendly and are tailored for individuals on the spectrum.
ATTENDEE INFO FORM - This is a great feature to collect information from your attendees before they pay for the ticket. There are multiple scenarios when you will need attendee info. For e.g. you have a dinner at the event and you want to know in advance food preferences of your guests, or you need to know how many are adults and kids in a group of 4 who have purchased tickets.
SUBMIT EVENT - As you type the details in the form, they get saved automatically. Click on "Submit Event" once the form is complete.
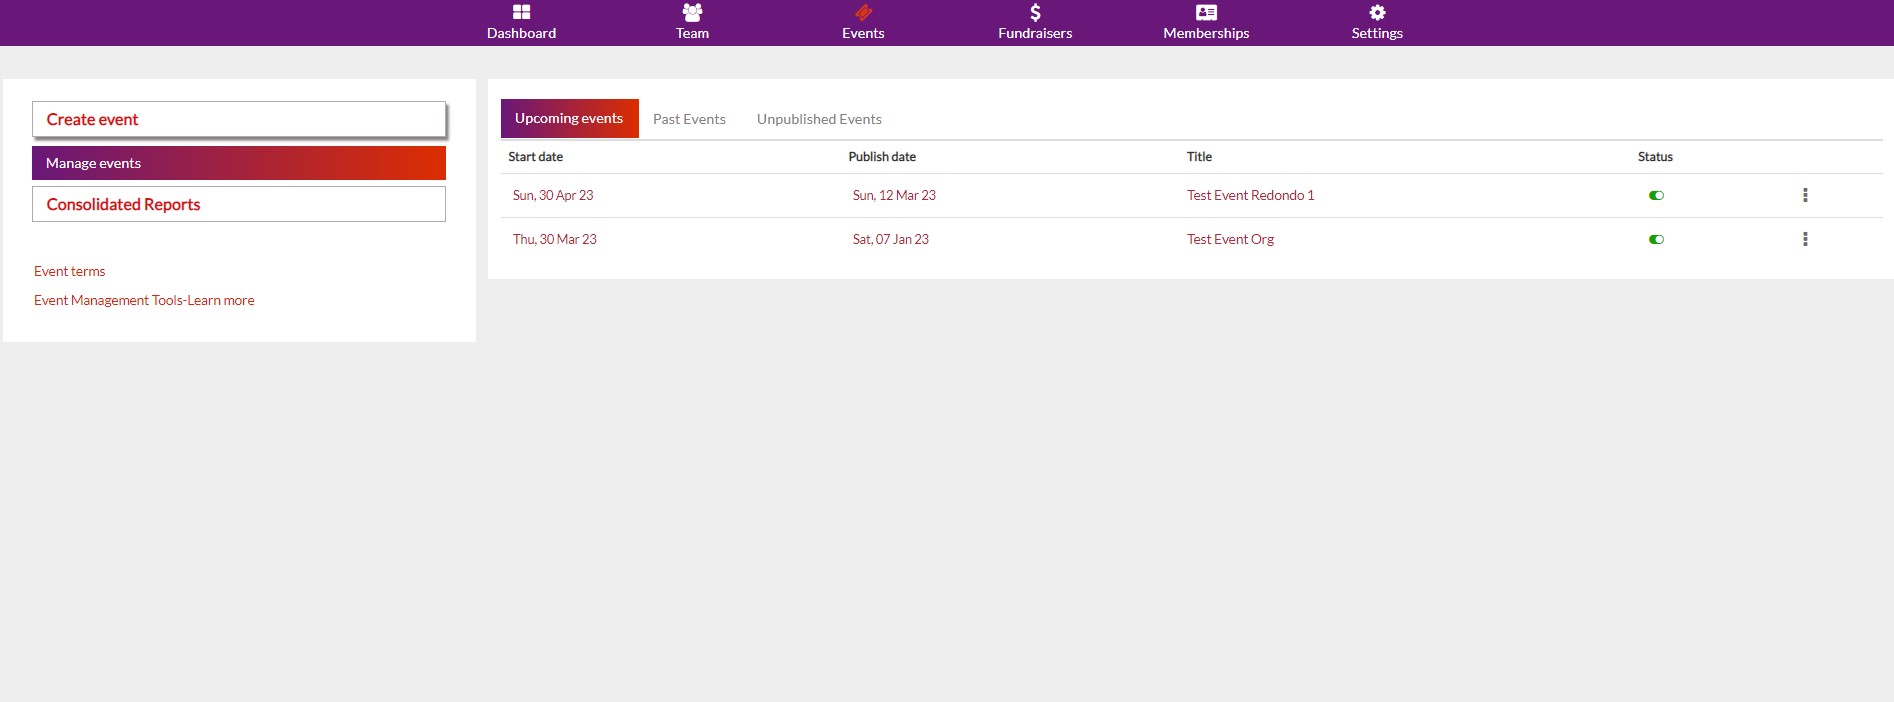
PUBLISH EVENT - Once you have submitted the event, the next step would be to publish it so people can view the event page. Here you can get a preview of the event you have created and edit it to make any changes. Click on the 3 dots in the last column and choose the option from the dropdown. Once you are sure, click on publish.
Once you click on "Publish event", your event gets published and shows under "Upcoming events" section on your Event Dashboard.
Once you have published your event, your event will appear under "Published events". Click on the 3 dots and choose the options from the dropdown (as below) to manage your event.
1. View your event
2. Edit allows you to edit the event form. After publishing, certain ticket changes can be done only in Ticket settings as shared below.
3. Addons : This will allow you to send reminder emails, copy discount code, attach a brochure image, create membership discounts and add a customized message to the ticket confirmation email.
4. Analytics: This gives you a snapshot of your sales showing your event revenues, number of tickets sold, ticket buyer and transactions report, and donations report. 5. Share event URL : Copy your event page URL and share it on social media and various other platforms. 6. Ticket settings: Here you can change the ticket price, the maximum quantity of tickets, and deactivate.
7. Sell tickets offline: Click on this and generate manual tickets for your attendees who have not purchased tickets online.
8. You can activate or de-activate your event at anytime using the toggle button under "Status". Green color shows that the event is active.
We understand your need for assigning tickets to your patrons who want a different payment option other than credit card OR who are not comfortable with the digital/online space. We have created the capability so you can issue tickets from your admin panel using a simple form.
On your events dashboard, under published events, click on the 3 dots next to your event.
Click on "Sell manual tickets"
On the form, fill in the basic details such as name, email (this is the email that will receive the ticket confirmation)
Add a personalized message for your customer
Add information for your own reference (For e.g. check no., seats assigned etc.)
Choose from dropdown - how the customer paid you? Payment via - Zelle, Paypal, Check etc.
Add the ticket amount. DO NOT include the donation amount in this field. If the tickets are offered for free, leave the amount blank.
Under the order summary, select quantity of tickets assigned for each ticket level. If any donation has been made, here you will add the donation amount against the field "Donation".
Click on "Next".
Review all the details that you entered and click on Submit.
Once the form is submitted, an email is sent to your guest with all the event details. You, the organizer, also gets an email with the transaction details.
All the transaction details are reflected in the Analytics under the Ticket buyer and the Transactions reports.
On your dashboard, click on the 3 dots next the the event, and select Ticket settings as shown below. Here you can change the price, quantity and status of each ticket level or type. Please use this feature carefully to avoid any last minute issues at the checkout for your attendees.
Note: For making changes to other event sections such as ticket type title, description, etc. go to Edit Event.
Extras include features such as reminder emails, promo/discount codes, membership integration and brochure. Where to find Extras? On your event dashboard, click on the 3 dots next to the event and choose Extras from the dropdown as below:
Reminder Email: This feature lets you send upto 3 email reminders to your registered attendees with a customized message. To add a message, click on "Click here" (to edit or add personalized message). Type your message and click on "Update". This updates your message. Now click on the "Send reminder" button. Once you send the reminder, the attendee will receive all the event details including ticket information, venue details etc. along with your message.
Discount codes: Here you will find the list of all coupons you have created on the Edit event form. You can copy the code here and share it with your guests if you would like to offer them a discount. To create a new code, please return to the Edit event page and go to the Promotions section.
Memberships: You can link your membership module to your event using this capability. Allow your members to avail free tickets or give them discount. To learn more, click on this Membership tools link and go to the tab "Integration with Events".
Brochure: If you have created an event brochure, you can attach the image file or a pdf copy of your brochure using the "choose file" button. Once the brochure is attached, it will show as a "Brochure" button on the published event page.
Customized message: You can add a personalized message for your ticket buyers. Once you update the message, it will display in the ticket confirmation email received by the ticket buyer.
The Vibrnz check-in app allows event organizers to efficiently manage attendee check-ins and registrations. It can be downloaded on your mobile device, and will enable your event staff/volunteers to scan and check in attendees as they arrive at the event.
Here is how it works:
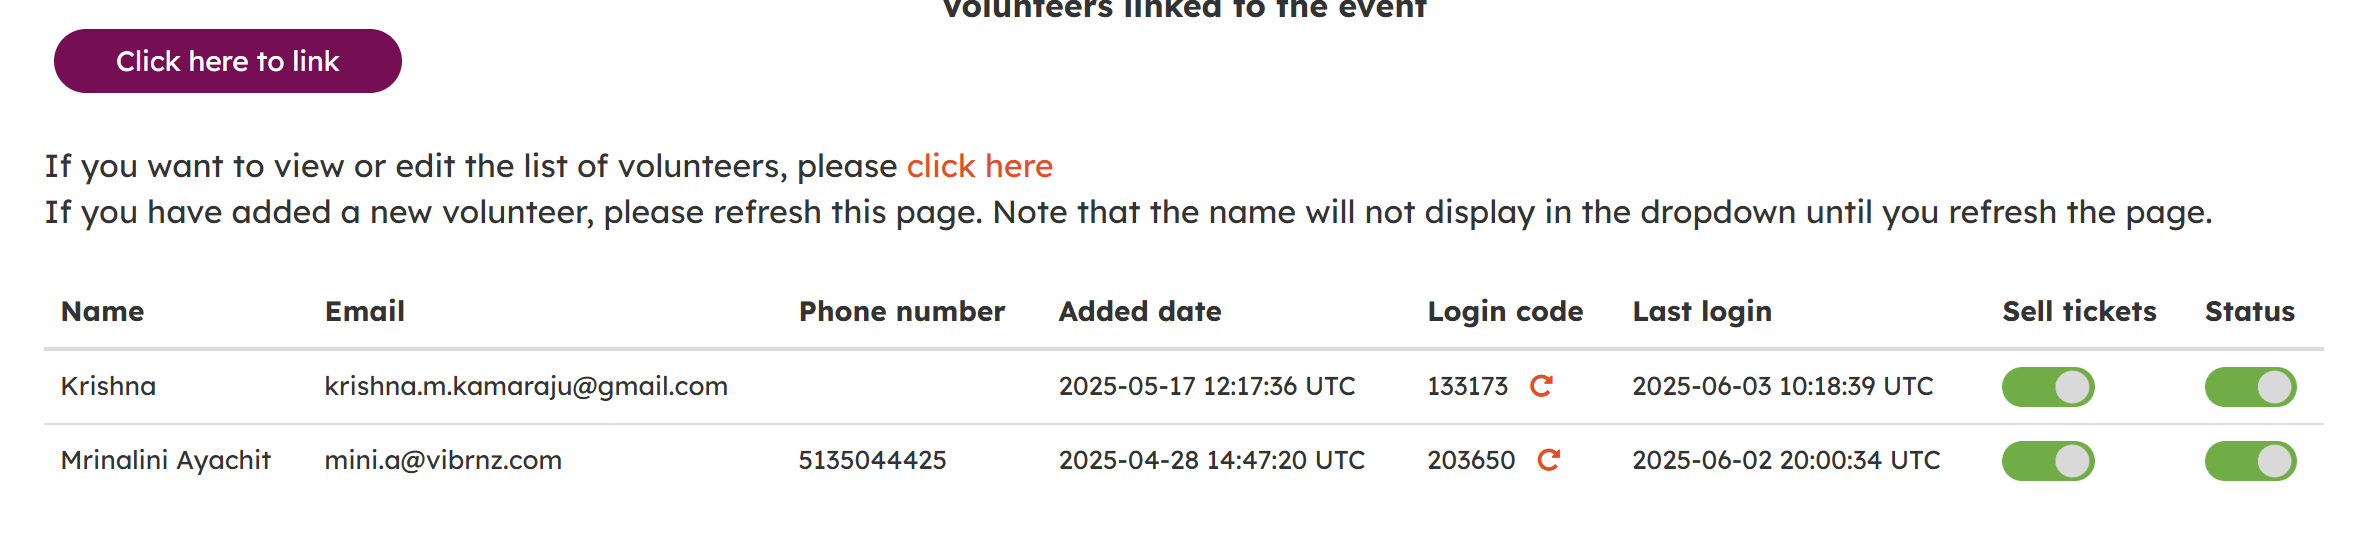
1. Link your volunteers to the event. Click on the 3 dots, and from the dropdown choose "Link volunteers". Note that the list of volunteers is saved and can be used for multiple events.
2. Clicking on "Link volunteers" takes you to a new page as below. If you have already created the list, just click on "Click here to link". That opens a box that will allow you to choose the volunteer and click on Add as shown below. Once you link the volunteer to the event, the volunteer receives an email with the login code that can be used to log into the Check-in app.
To edit or create a new list of volunteers, click on "click here".
3. You can edit or add new volunteers on the page below. Add volunteer name, email, phone number (optional). To access this page, you can follow the steps shared above, or access the page from the link as shown below on the left menu of your events dashboard.
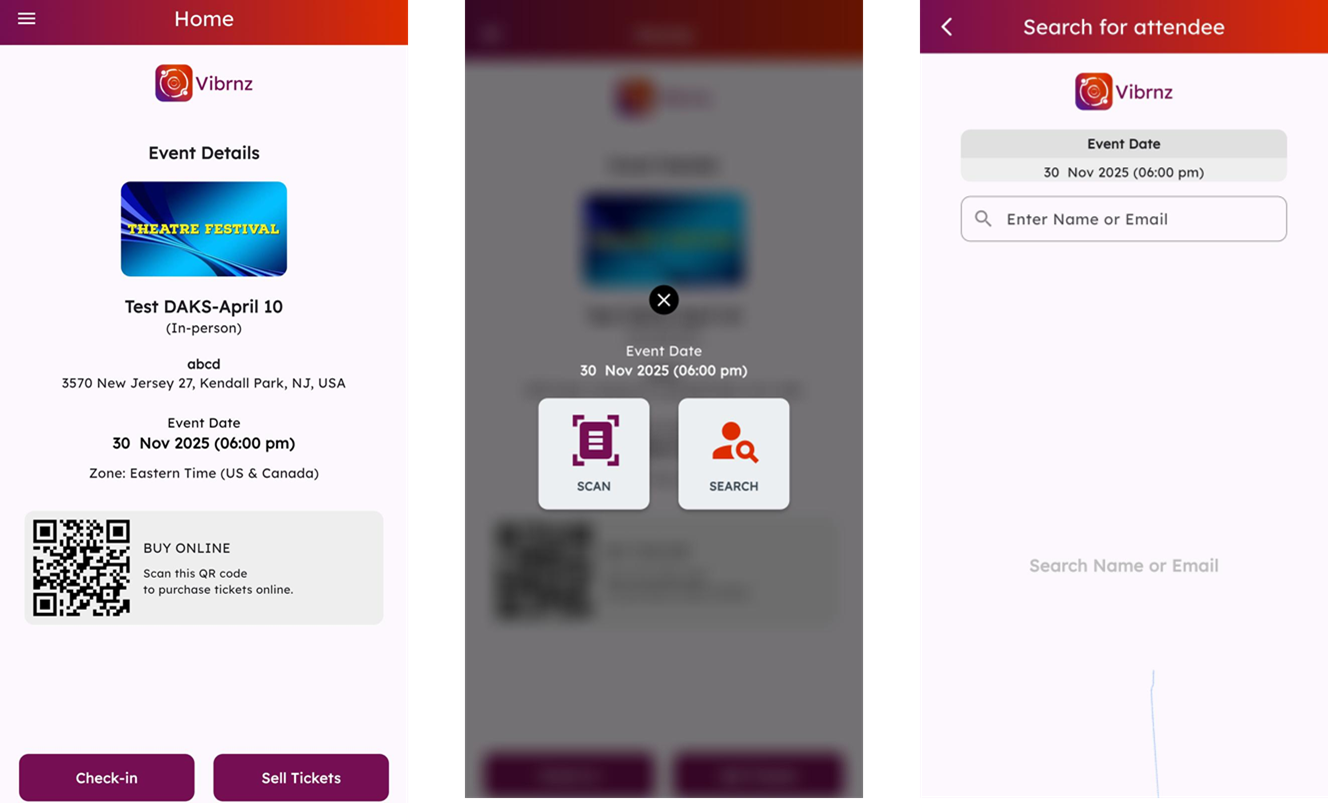
4. Check-in Volunteers download the Vibrnz Organizer app in the Apple or Android App store.
5. Steps to check-in event attendees
To access check-in app, authorized volunteers get a check-in code in their email. To start checking in guests, following are the steps:
Open the Vibrnz app > Key in the code received in the email > Key in the registered email and access the app to start checking in guests. Note that the access code is specific to an event.
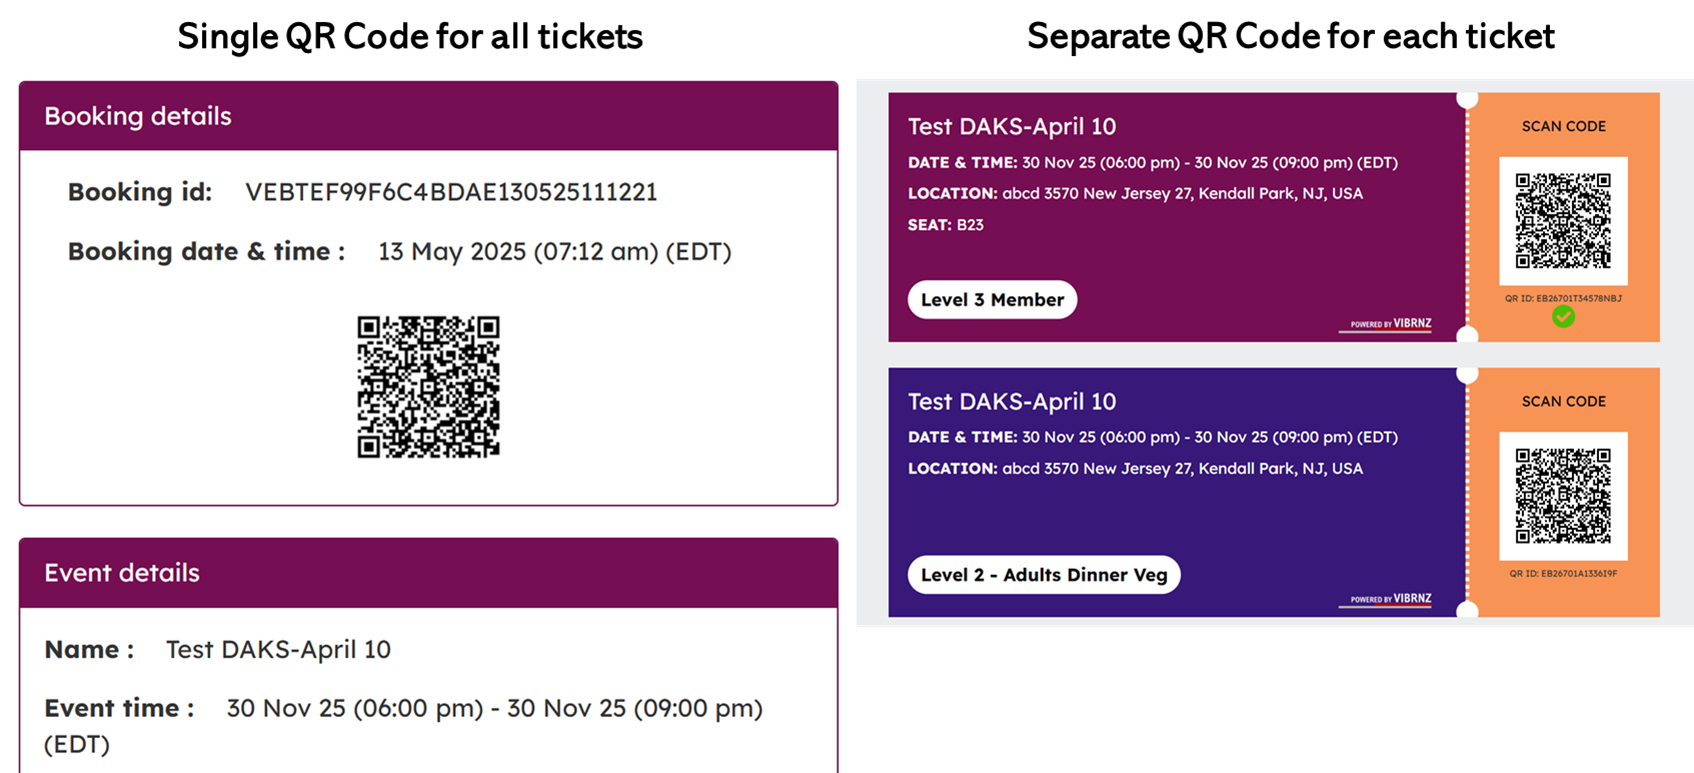
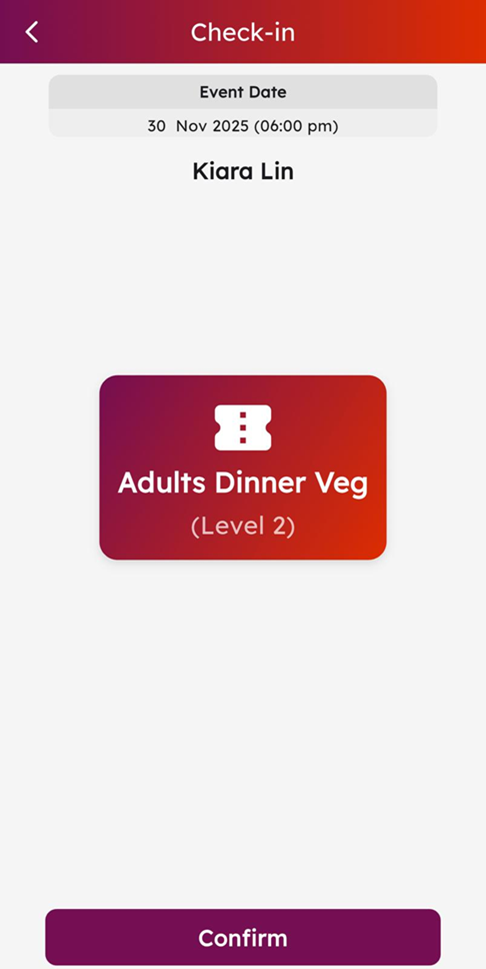
Ticket buyers have the option to show Single QR code that will allow the volunteer to check-in all tickets in one go OR individual tickets as shown below
- Volunteer logs into the app using the code that was sent using step #2
- Click on "Check-in" button and click on SCAN. If the guest does not have a QR code, click on SEARCH to find the buyer details by name
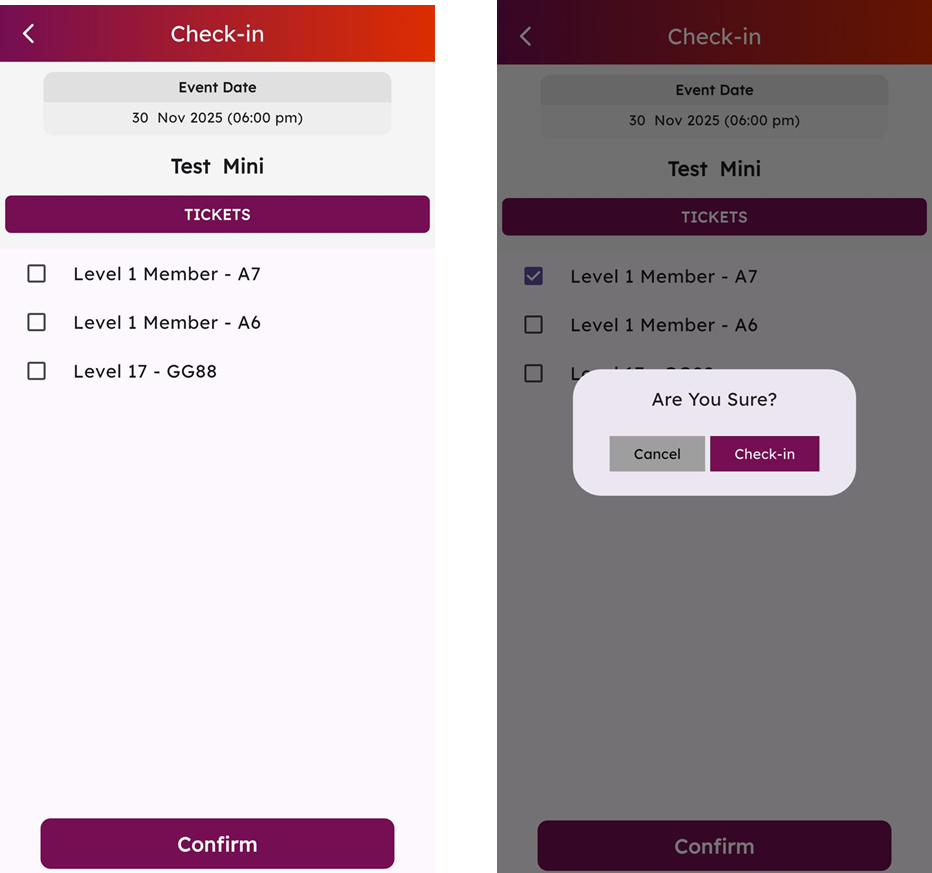
- Upon scanning the QR code the ticket buyer seats or tickets will come up. Check one or multiple and confirm to complete the check-in.
- Single Ticket QR brings up the the ticket as below. Click on confirm to complete the check-in for that ticket
6. Analytics - Check-in report : You can view the check-in report at anytime in your Analytics on the web. On the web, go to your events dashboard-click on the 3 dots for the event, and choose Analytics from the drop down. On the top right, choose "Check-in report" from the dropdown. This report will display the name, email, booking id and other details of who checked-in at your event.
Organizing your event at a venue with theatre seating? You can use our seating map feature to assign seats to various ticket levels.
Please contact us for a demo or more details. Our email is info@vibrnz.com
Analyze your ticket sales data. By analyzing ticket sales data, you can identify which pricing tiers are selling the most tickets. This can help you optimize your ticket pricing strategy to maximize revenue. Learn who is buying your tickets. Reachout to them for feedback, and engage them for future events.
Following reports provide you a snapshot as well as an in-depth look into your event statistics. Choose the report you want to view under "Reports" and click on View.
1. Sales Dashboard: This shows your total inflows (including ticket sales and donations). This amount is net of service fee. Adjustment NOT reflected if the service fee is absorbed.
2. Ticket buyer report: This provides you the list of your ticket buyers including their name, email, ticket quantity and purchase amount, etc.
3. Ticket level report: If your event has multiple ticket levels such as Regular, VIP, VVIP etc. this report will help you know which level has sold the most.
4. Transactions report: This shows you transaction details such as service fee paid, payment amounts, transacton id, etc.
5. Donations report: This gives you a breakup of donations made, amount, donor name, donor email etc.
You have created and managed multiple events on Vibrnz throughout the year and over the period of last 2 years. Wouldn't you like to get a summary of your cumulative earnings, registered users, donations received and other useful information? By analyzing historical ticket sales data, you can create a forecast for future ticket sales. This can help you plan for future events, adjust marketing and pricing strategies, and allocate resources more effectively.
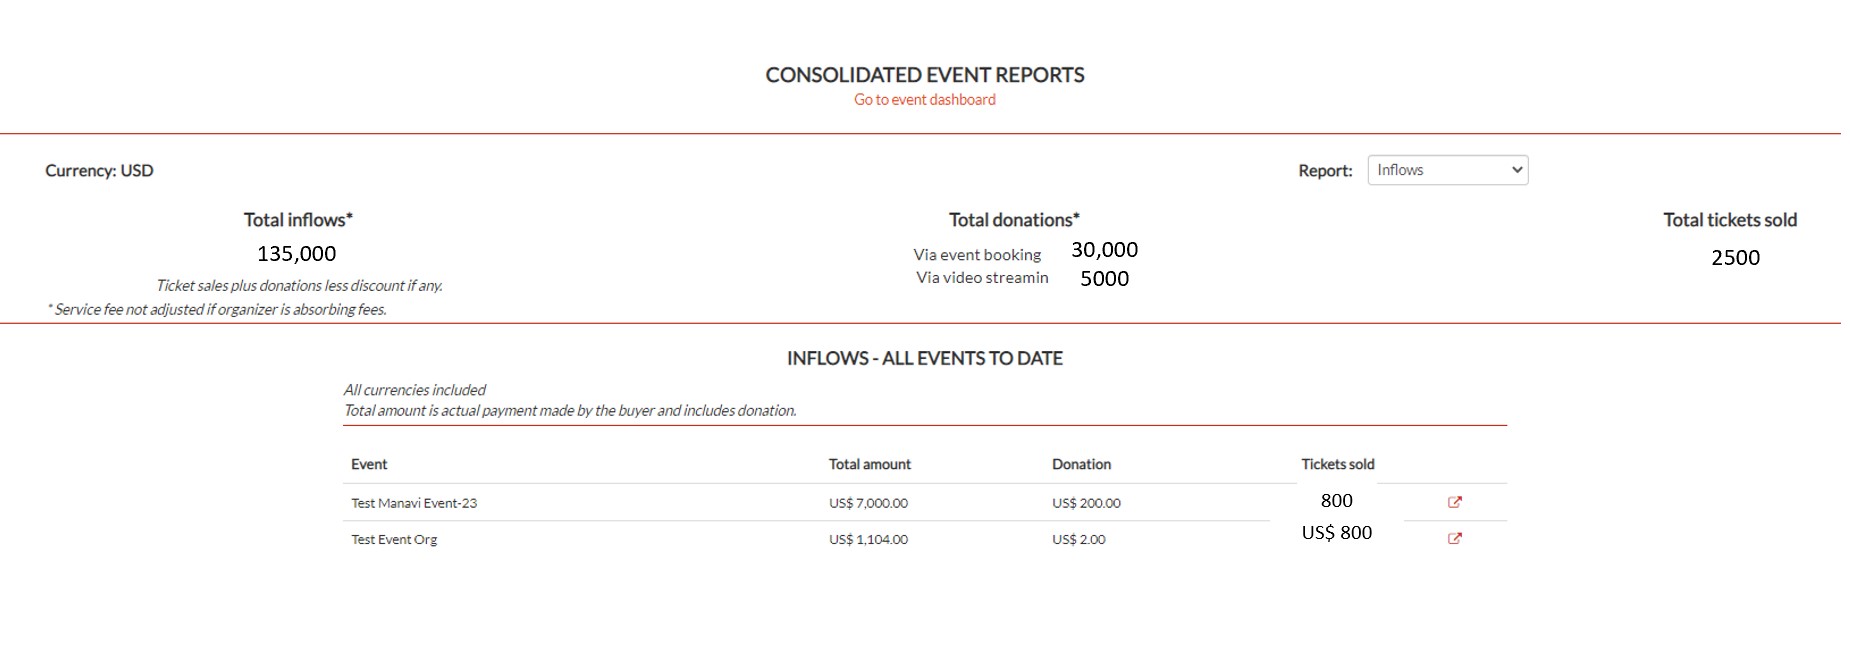
Our Consolidate Analytics lets you view and download consolidated data across all the events organized till date. Filtering by year coming soon! 2 years of data available for free. Beyond that charges will apply.
How it works?
Click on "Consolidated reports" on your dashboard. View and download reports from the dropdown.
Vibrnz is a one-stop-solution that allows you to manage your events, fundraisers and memberships - all on a single platform.
Membership management is a tool you use to grow your community of patrons and generate revenue through membership contributions. Vibrnz allows you to create and accept memberships through our membership module and integrate the module with events.Your members receive a set of benefits based on the membership type they pay for. One of the member benefits is free tickets or discounted tickets to your events.
Learn more on how you can provide free or discounted tickets to your members by clicking here.
Create promo or discount codes and increase your ticket sales. There are multiple ways you can offer discount codes. Here is the step by step process on how to create a promo code:
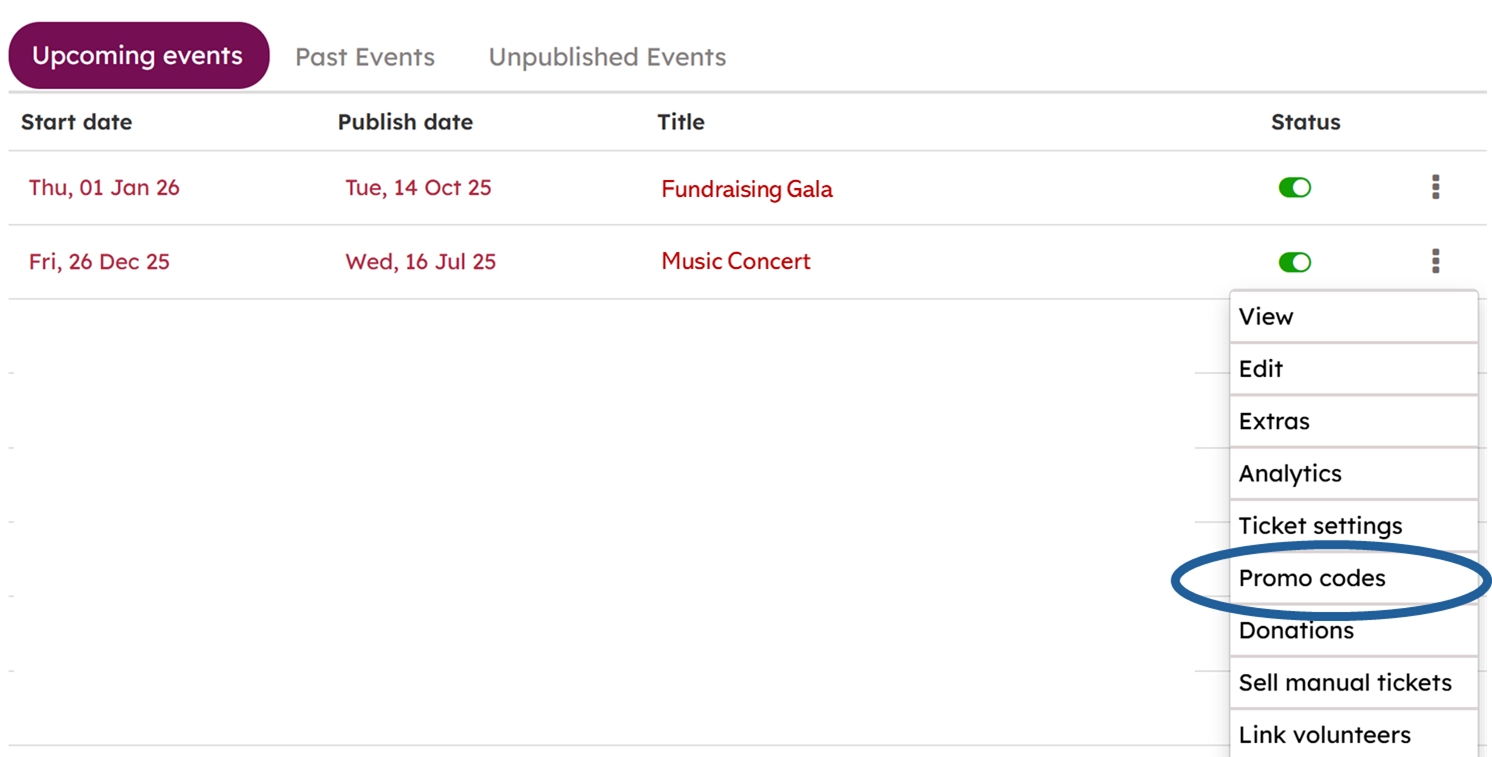
1. Published events: Go to the event>>3 dots>>Promo codes
2. Create new code: Ensure you enable the status, then click on "Create Code" button
3. Coupon details: Add code name, fill in other fields, choose ticket levels and click on "create code" button.
You can apply discount on all or some specific ticket levels. Choose the "Ticket level" option and select the ticket levels under Apply code. Note that the discount will apply on each ticket. For eg. if the code allows discount of $10, price of each ticket gets reduced by $10. You can also apply Minimum and Maximum quantity of Tickets that your attendees can choose to avail the discount within each Ticket level.
You can choose "Cart Level" and apply discount across ticket levels.Note that in case of Cart level, for eg. if the code allows discount of $10, this discount is applied at the total level. Price of each ticket does not get reduced by $10. You can also apply Minimum quantity of tickets that your attendees can choose to avail the discount within each Ticket level.
4. Edit/View: Once the promo code is created, you can edit the code name, change the minimum/maximum qty. Just click on View/Edit.
How do you collect payments when you create paid events on Vibrnz?
Vibrnz is integrated with Stripe, a global payment processing platform. This helps us process your payments safely and securely. None of your credit card data is stored on our servers. Steps to follow to collect your payments:
Create a Stripe Account: Go to Stripe.com. Click on Sign in. If you do not have an account, it will ask you to sign up. Follow the instructions.
Link your Vibrnz account to your Stripe account After you login, on your Dashboard, click on Settings - go to Payment settings - Connect a Stripe account. Once you click on Connect, you will be taken to the Stripe website. Just follow the instructions.
Once the linking is complete, the above section under "payment settings" will display the details of your Stripe account. You can start receiving payments into your Stripe account everytime a ticket purchase happens. Payouts to your bank are based on your Stripe settings. To know more about Stripe, click for details. For payout details from Stripe, please read here.
PayPal as a payment option: Vibrnz also provides PayPal as a payment option even as Stripe is our preferred payment gateway. To connect with a PayPal account, please email us info@vibrnz.com.
How much does it cost you to create and manage events on Vibrnz?
You pay NOTHING for creating or managing your events on Vibrnz. The basic features are 100% FREE forever if your attendees pay the service fee when they purchase the tickets on Vibrnz. Service fee is the total of Stripe (payment processing) fee and Vibrnz (platform) fees.Our service fee is among the lowest in the market! Compare with Eventbrite and others.
Service fees - 1% plus $0.55 per ticket Vibrnz (platform) fees plus the Stripe (payment processing) fees of 2.9% plus $0.30. For verified non-profits, discounted fee might apply. To learn more, click on payout guidelines.
Concierge services: DIY and it is completely free. But we understand that you might be tied up with a number of activities as you run your business. No problem. We have you covered. Pay us a small fee and we will take care of your event starting from creating your branded event page, banner, setting up your ticketing etc. Reach out to us for fees charged for concierge services.
Premium features like Reserved seating, member only tickets, additional data storage, manual tickets, SMS service, consolidated analytics etc. will have a fee. Email us at info@vibrnz.com or call us!
Manual tickets feature: Selling tickets manually from your admin is a great feature for your patrons. You only pay the platform fee. You do not pay the payment processing fee since payment is not processed through the platform (via Stripe).
Just like you can stream your events to various social media platforms like YouTube and Facebook, you can also stream your event to Vibrnz.
What differentiates Vibrnz?
Authorized access: Vibrnz provides you the ability to create "authorized access" to your event meaning only those who have registered or paid for the event can get access.
Post event monetization: You can continue to stream the event after the live event is over. This is a good option for those who could not attend the live event. You can still charge to grant access to the event.
Donations: You can accept donations along with your tickets and while the event is streaming virtually. Get a peak into one of the the student recitals that was organized on our platform and was open for public viewing. Click here to view.
How do you stream your event to the Vibrnz website?
We will provide you an RTMP URL and a Stream Key.
Paste the URL and stream key into your encoding software's settings and begin streaming.
Vimeo: We use Vimeo as our streaming server. To provide the best audio and video experience for your audience, please click here to learn about the Vimeo guidelines.
For further details, please reach out to us and we will be happy to help you. You can email us at info@vibrnz.com and also submit this form for any inquiry. We will get back to you promptly.
As an event organizer, you can offer your ticket buyers the option to receive ticket confirmations via SMS, in addition to the traditional email confirmations. Note this service is subject to the SMS Terms. For pricing, please reach out to us at info@vibrnz.com.
Benefits:
Improved Customer Experience: Providing SMS confirmations ensures your attendees receive immediate and reliable communication, enhancing their overall experience.
Reduced Support Inquiries: With instant SMS confirmations, attendees are less likely to encounter issues with missing or delayed emails, leading to fewer customer support requests.
Higher Engagement: SMS notifications are typically read within minutes, ensuring your attendees have all the information they need right away, increasing engagement and preparedness for your event.
How It Works:
Enable SMS Option: As an event organizer, you can easily enable the SMS confirmation feature for your events through your Vibrnz dashboard.
Customer Information: During ticket purchase, customers will have the option to enter their mobile number to receive SMS confirmations.
Automatic SMS Dispatch: Upon purchase confirmation, an SMS with the ticket details are sent to the customer's phone.
Steps to follow for the Organizers
Organizers purchase the SMS service. Based on the subscription, they will be given permission for SMS with an annual quota.
On your Vibrnz dashboard: Settings>>SMS Settings will display the SMS details at any point of time. This will display the Total SMS quota, and the number of messages sent.
3. Add SMS option: Once the purchase has been made, organizers have the option to link (or not link) the event with SMS service. They can do so in the Edit form under Tickets section as below. Check the Phone number checkbox to get the SMS option, and select the SMS option. Now the attendees will have the option to receive SMS.
4. Reminder SMS: Similar to Reminder emails, organizers can send reminder emails by clicking on 3 dots>>Addons>>Reminder SMS. Organizers can send upto 2 SMS. The reminder message will go to all attendees who purchased tickets and allowed to be sent SMS after ticket purchase.
5. Analytics: In Ticket Buyers report, for each event the organizer can view the number of SMS messages sent. The organizer can also view for each transaction, the SMS confirmation made by the purchaser, by clicking on View under the Details column.
How it works for the ticket buyers?
After the buyers complete the ticket purchase, they get an option to allow SMS for ticket confirmation as below
The phone number for SMS automatically gets displayed. Buyer has the option to change the number. Once the Submit button is clicked, they receive the SMS message with the link to their Ticket page.
Event organizers can cancel tickets for a seated OR a non seated event, create a cancellation and refund record, and send update emails to your cutomers.
Note: Currently the refund can only be issued manually - outside of the Vibrnz platform (via Stripe, check, cash or any other preferred mode of payment).
Here is how it works:
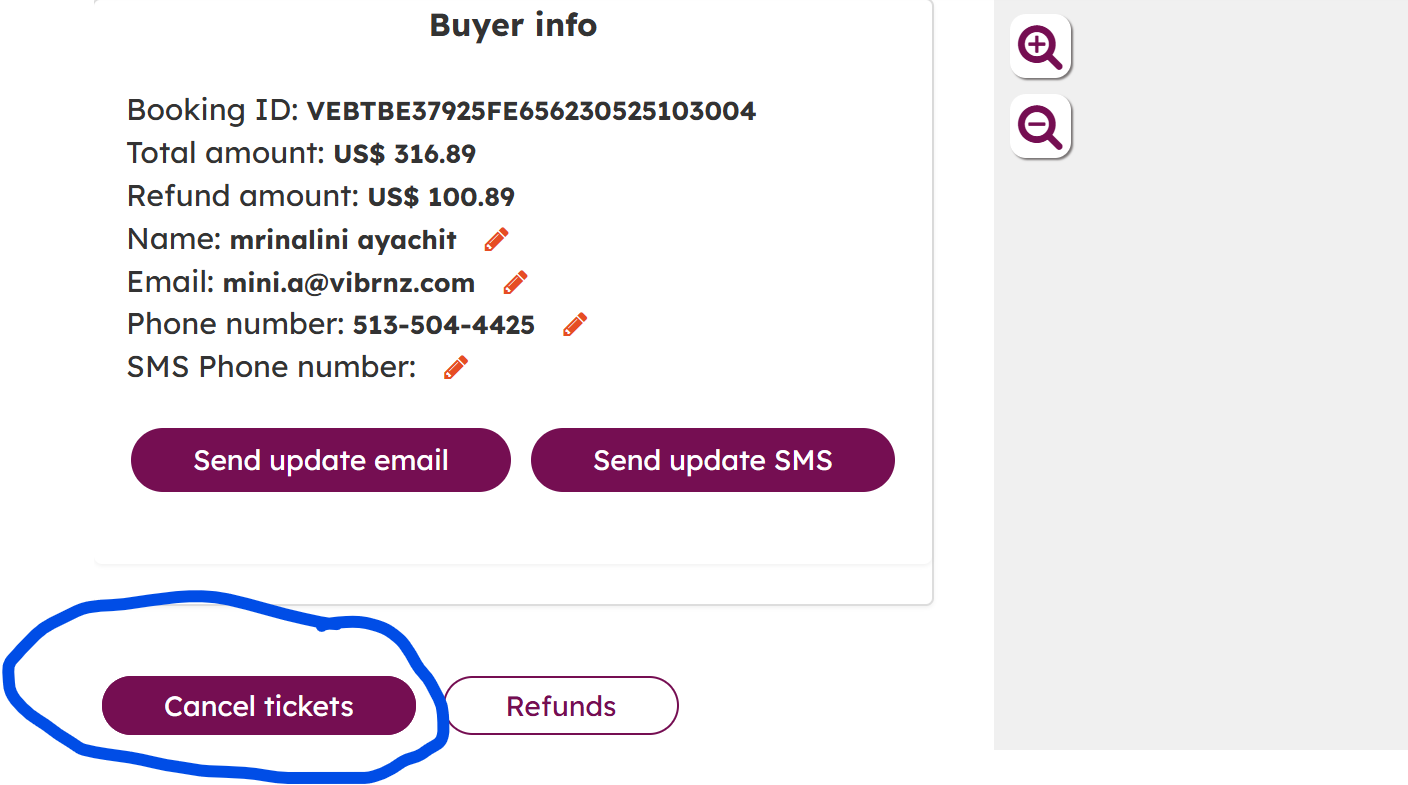
1. Cancel tickets: Go to the event>>3 dots>>Analytics>>Ticket Buyer report>>Edit (against the specific buyer name whose seat or ticket needs to be cancelled) as below
2. Edit: Click on Edit>>Cancel Tickets (under Buyer info on the left side of the page)
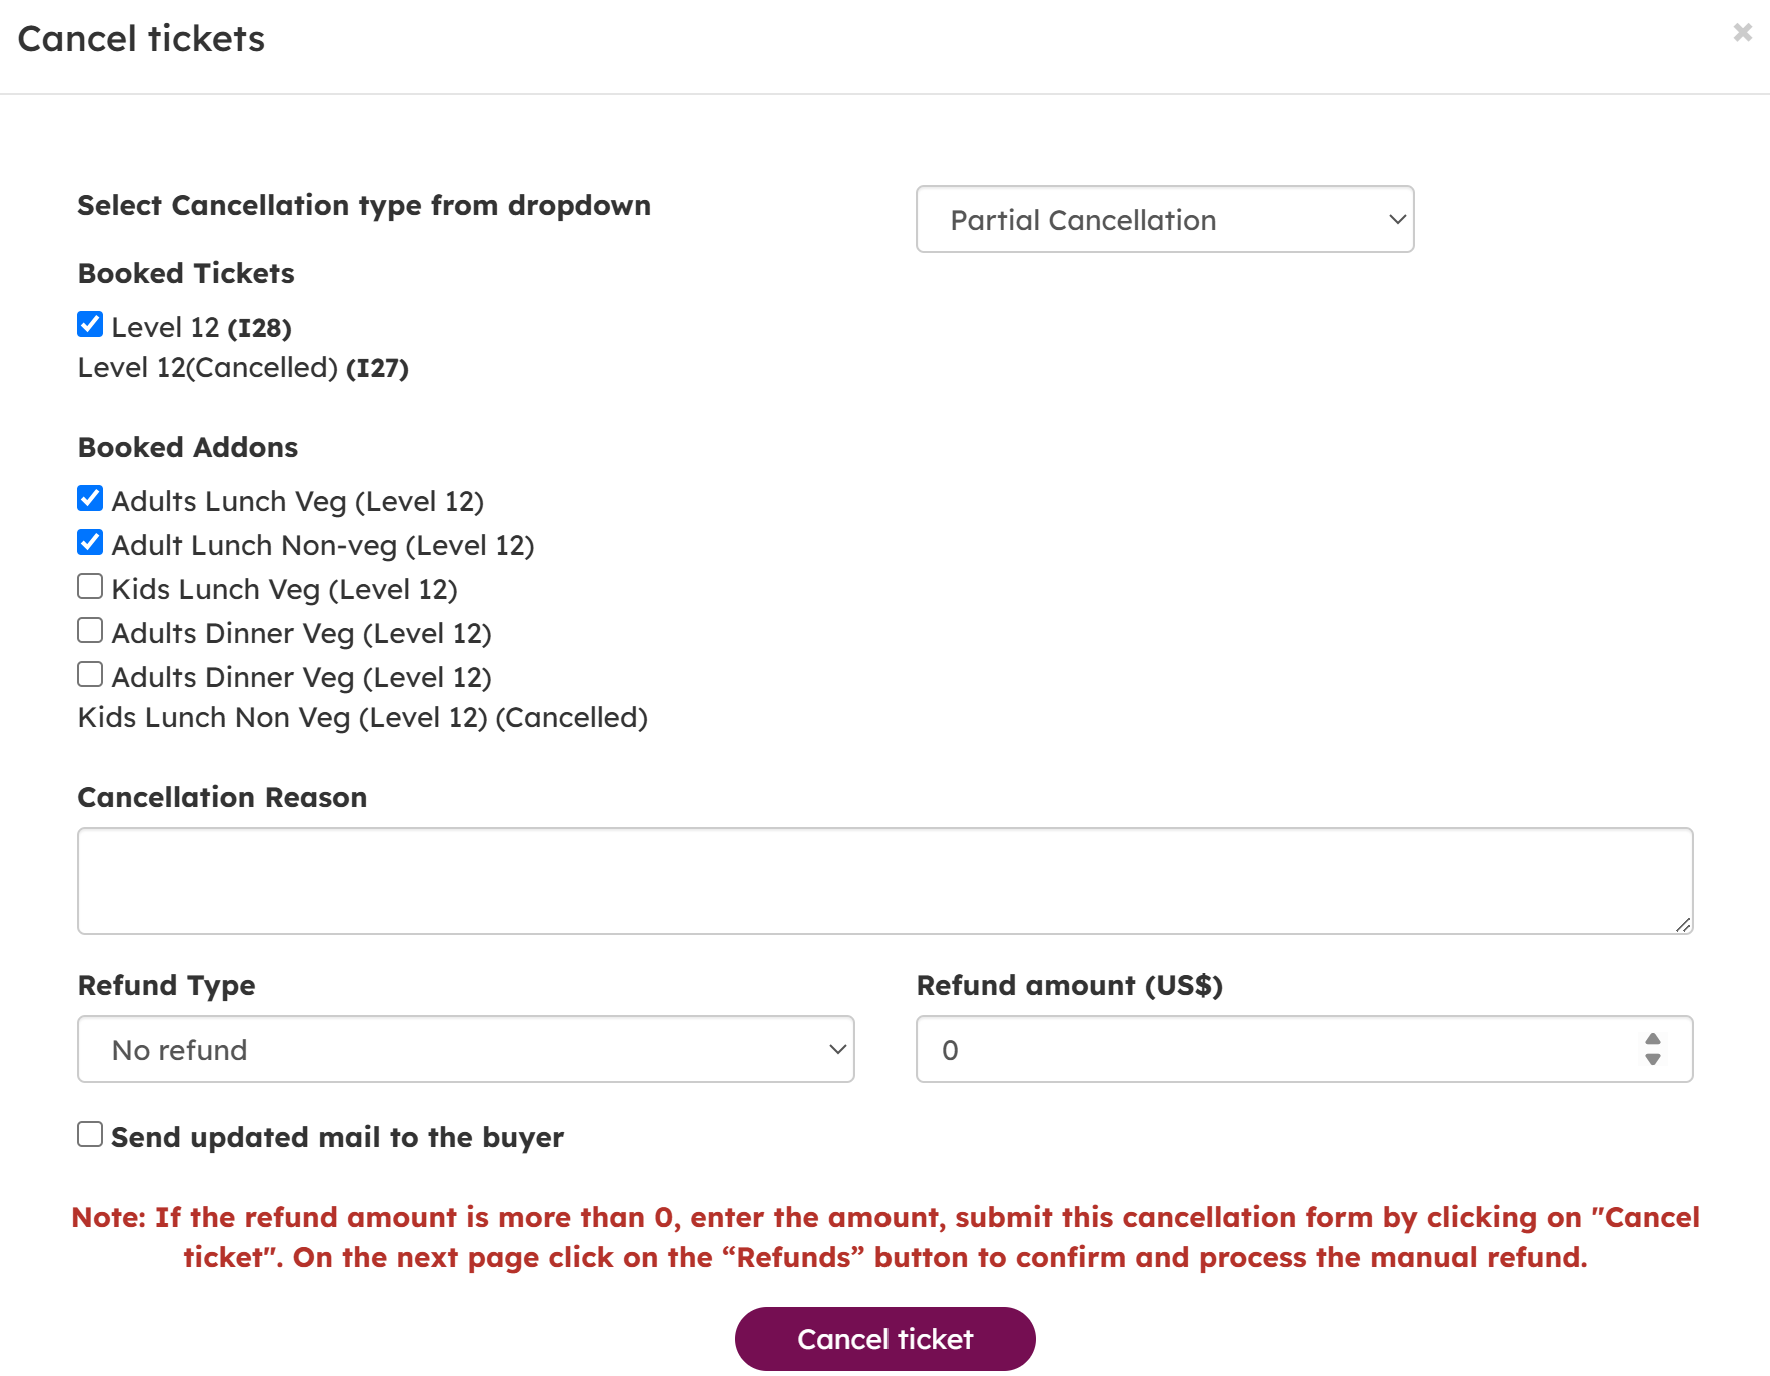
3. Cancel Tickets: Fill up and submit the form in few simple steps.
Choose cancellation type>>choose the seats and add-ons to be cancelled>>choose refund type>>check the box if you want to send out the update to the buyer>>click on cancel ticket button
Note on refund type: In refund type dropdown, if you choose manual refund, enter the amount you need to refund or else choose no refund
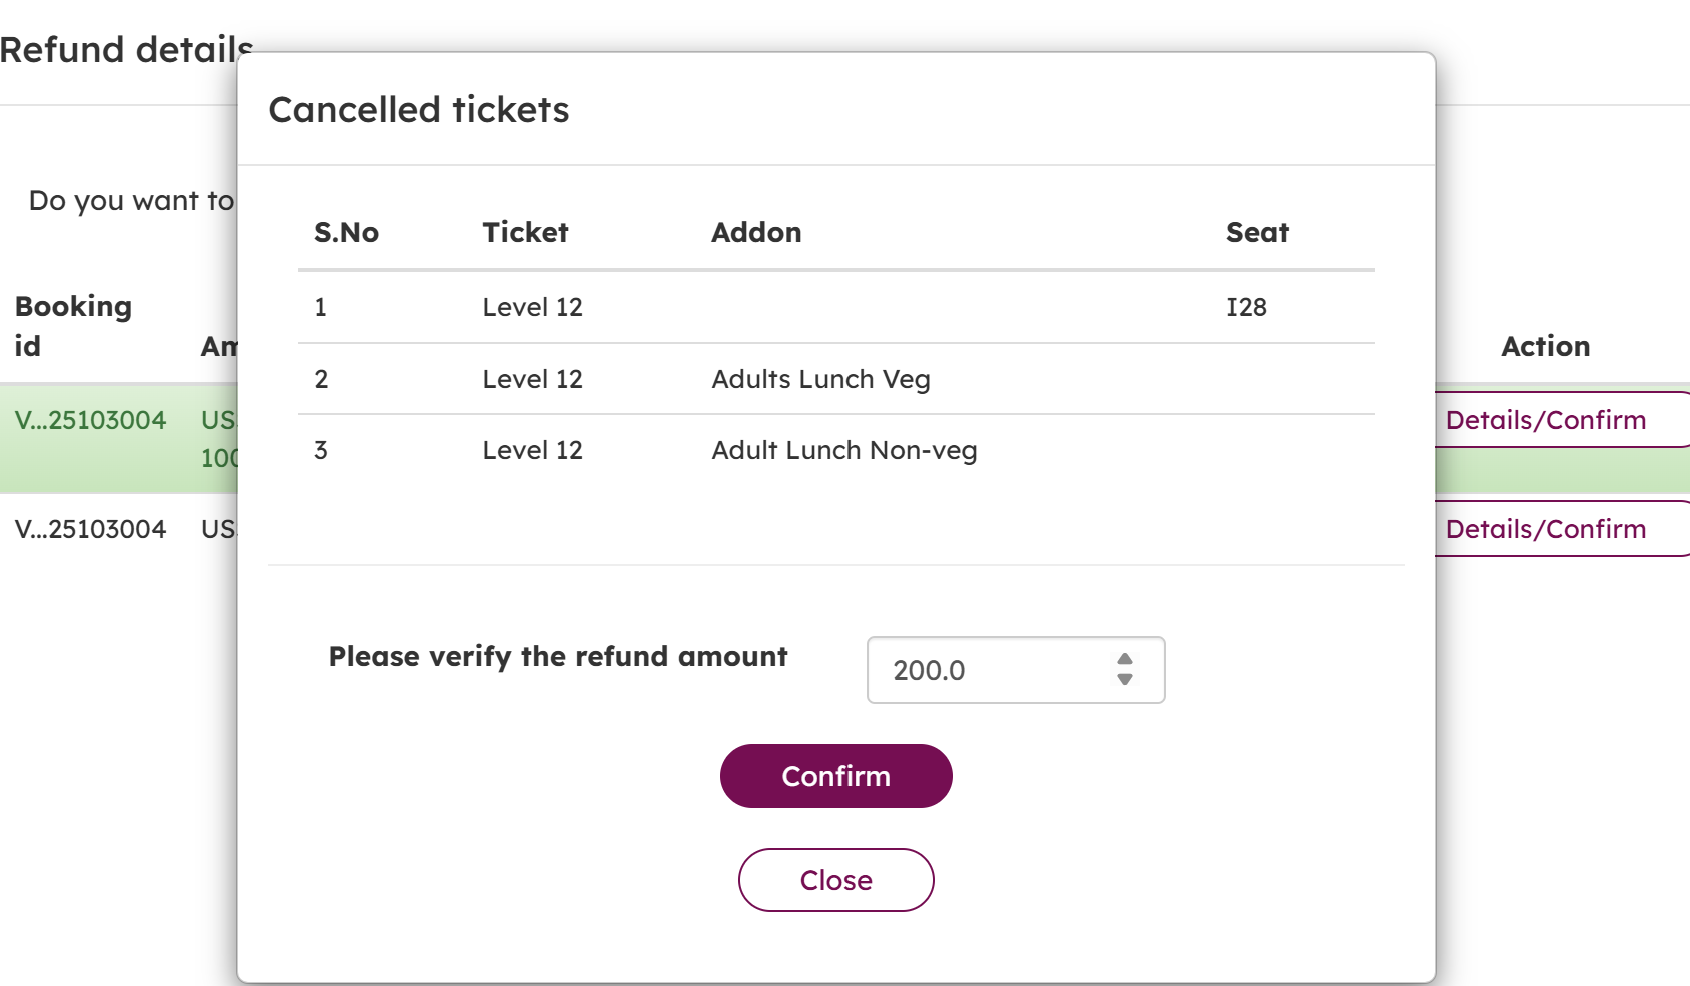
4. Refunds: If you entered the manual refund amount, you are required to confirm the refund amount in a different pop up after you submit the cancelllation form.
Before confirming the refund amount, the refund will display as "initiated". Once it is confirmed, it gets recorded as confirmed.
5. Analytics: Once the tickets or seats are cancelled, and the refund amount is processed as shown above, Analytics will reflect all the changes - in the ticket quantity, and the earnings. Seats, once cancelled, will be available for purchase again.
6. Email communication: You can easily trigger an email (and SMS) to the buyer with the updated status of their order.
The Teams feature on Vibrnz makes it easy for multiple people from the same organization to access and manage the events, memberships or fundraisers using their own individual login. Instead of sharing one common username and password, each team member can create their own (Individual) Vibrnz account and then be invited to join the organization by the Root User (main registered user). Once invited, the team member can log in separately and use the features they have access to based on the permissions set for them.
How it works?
Step 1 - Each team member creates their own individual account on Vibrnz. (Go to www. vibrnz.com >> login/free sign up>>Individual>>verify email. Once verified, choose profile type "Professional" when prompted in the signup process.
Step 2 - The Root User sends the team member an invitation to join the organization’s team (Login as organization>>Settings>>Teams on the left menu>>Invite new>>Search user name>>Select permission>>Send invite
Step 3 - Team member logs in>>Settings>>Organization settings>>Accept invite>>Dashboard (This Dashboard will take the team member to the organization's Events/Memberships/Fundraisers based on the permissions.
At all times the team member can view the organization name on the top right - they can use the top right menu to switch between individual account and that of the organization they are part of.
Too much going on? Need help managing your event? No worries, we are here to help.
We will create and manage your event end to end for a one time fee (Fee varies depending on the effort involved). You can email us at info@vibrnz.com or submit this form and we will reach out to you promptly.
Need help with streaming? We can discuss the options and pricing with you. It depends on the effort and time involved. For basic pricing, please refer to the pricing section.
Vibrnz provides an End to End solution for you to create and manage your event seamlessly so you can focus on what you do best. Organize virtual, in-person and hybrid events using the Vibrnz platform using our end-to-end solution.
The solution: Webpage - Registrations - Ticketing - Streaming - Post event monetization
1. Create a customized event page with your branding.
2. Set up single or multi-level ticketing- Free or Paid.
3. Add donations and share your story and goals.
4. Add artist and participant profiles.
5. Get paid easily by linking your Vibrnz account to Stripe - our payment processing platform.
6. Create a customized playbill/brochure with your branding (add sponsors etc.)
7. View the concert in a great virtual setting (shown below)
8. Keep the event "open to all" or make it a "paid only" event with authorized access so only those who paid can get access. 9. Send reminder emails, and order confirmations 10. Check ticket insights anytime 11. Monetize post event by streaming the event after the live event is over.
12. If you need assistance with video editing, fliers or teasers, we will also assist you with that (for a fee).