VIBRNZ MEMBERSHIP MANAGEMENT TOOLS
Grow and Engage your community!
Vibrnz offers cloud based Membership Management Software for cultural associations, arts organizations, chambers of commerce, and various other membership-based organizations. The self-service digital tools are a great way to grow and retain your community, increase engagement with your members and drive up your revenues.
Our platform lets you create a web-based and mobile friendly form. Collect member information, add multiple membership levels, add payment options, integrate membership with events to provide free tickets to your members and more!
Get started with your membership form in a few simple steps!
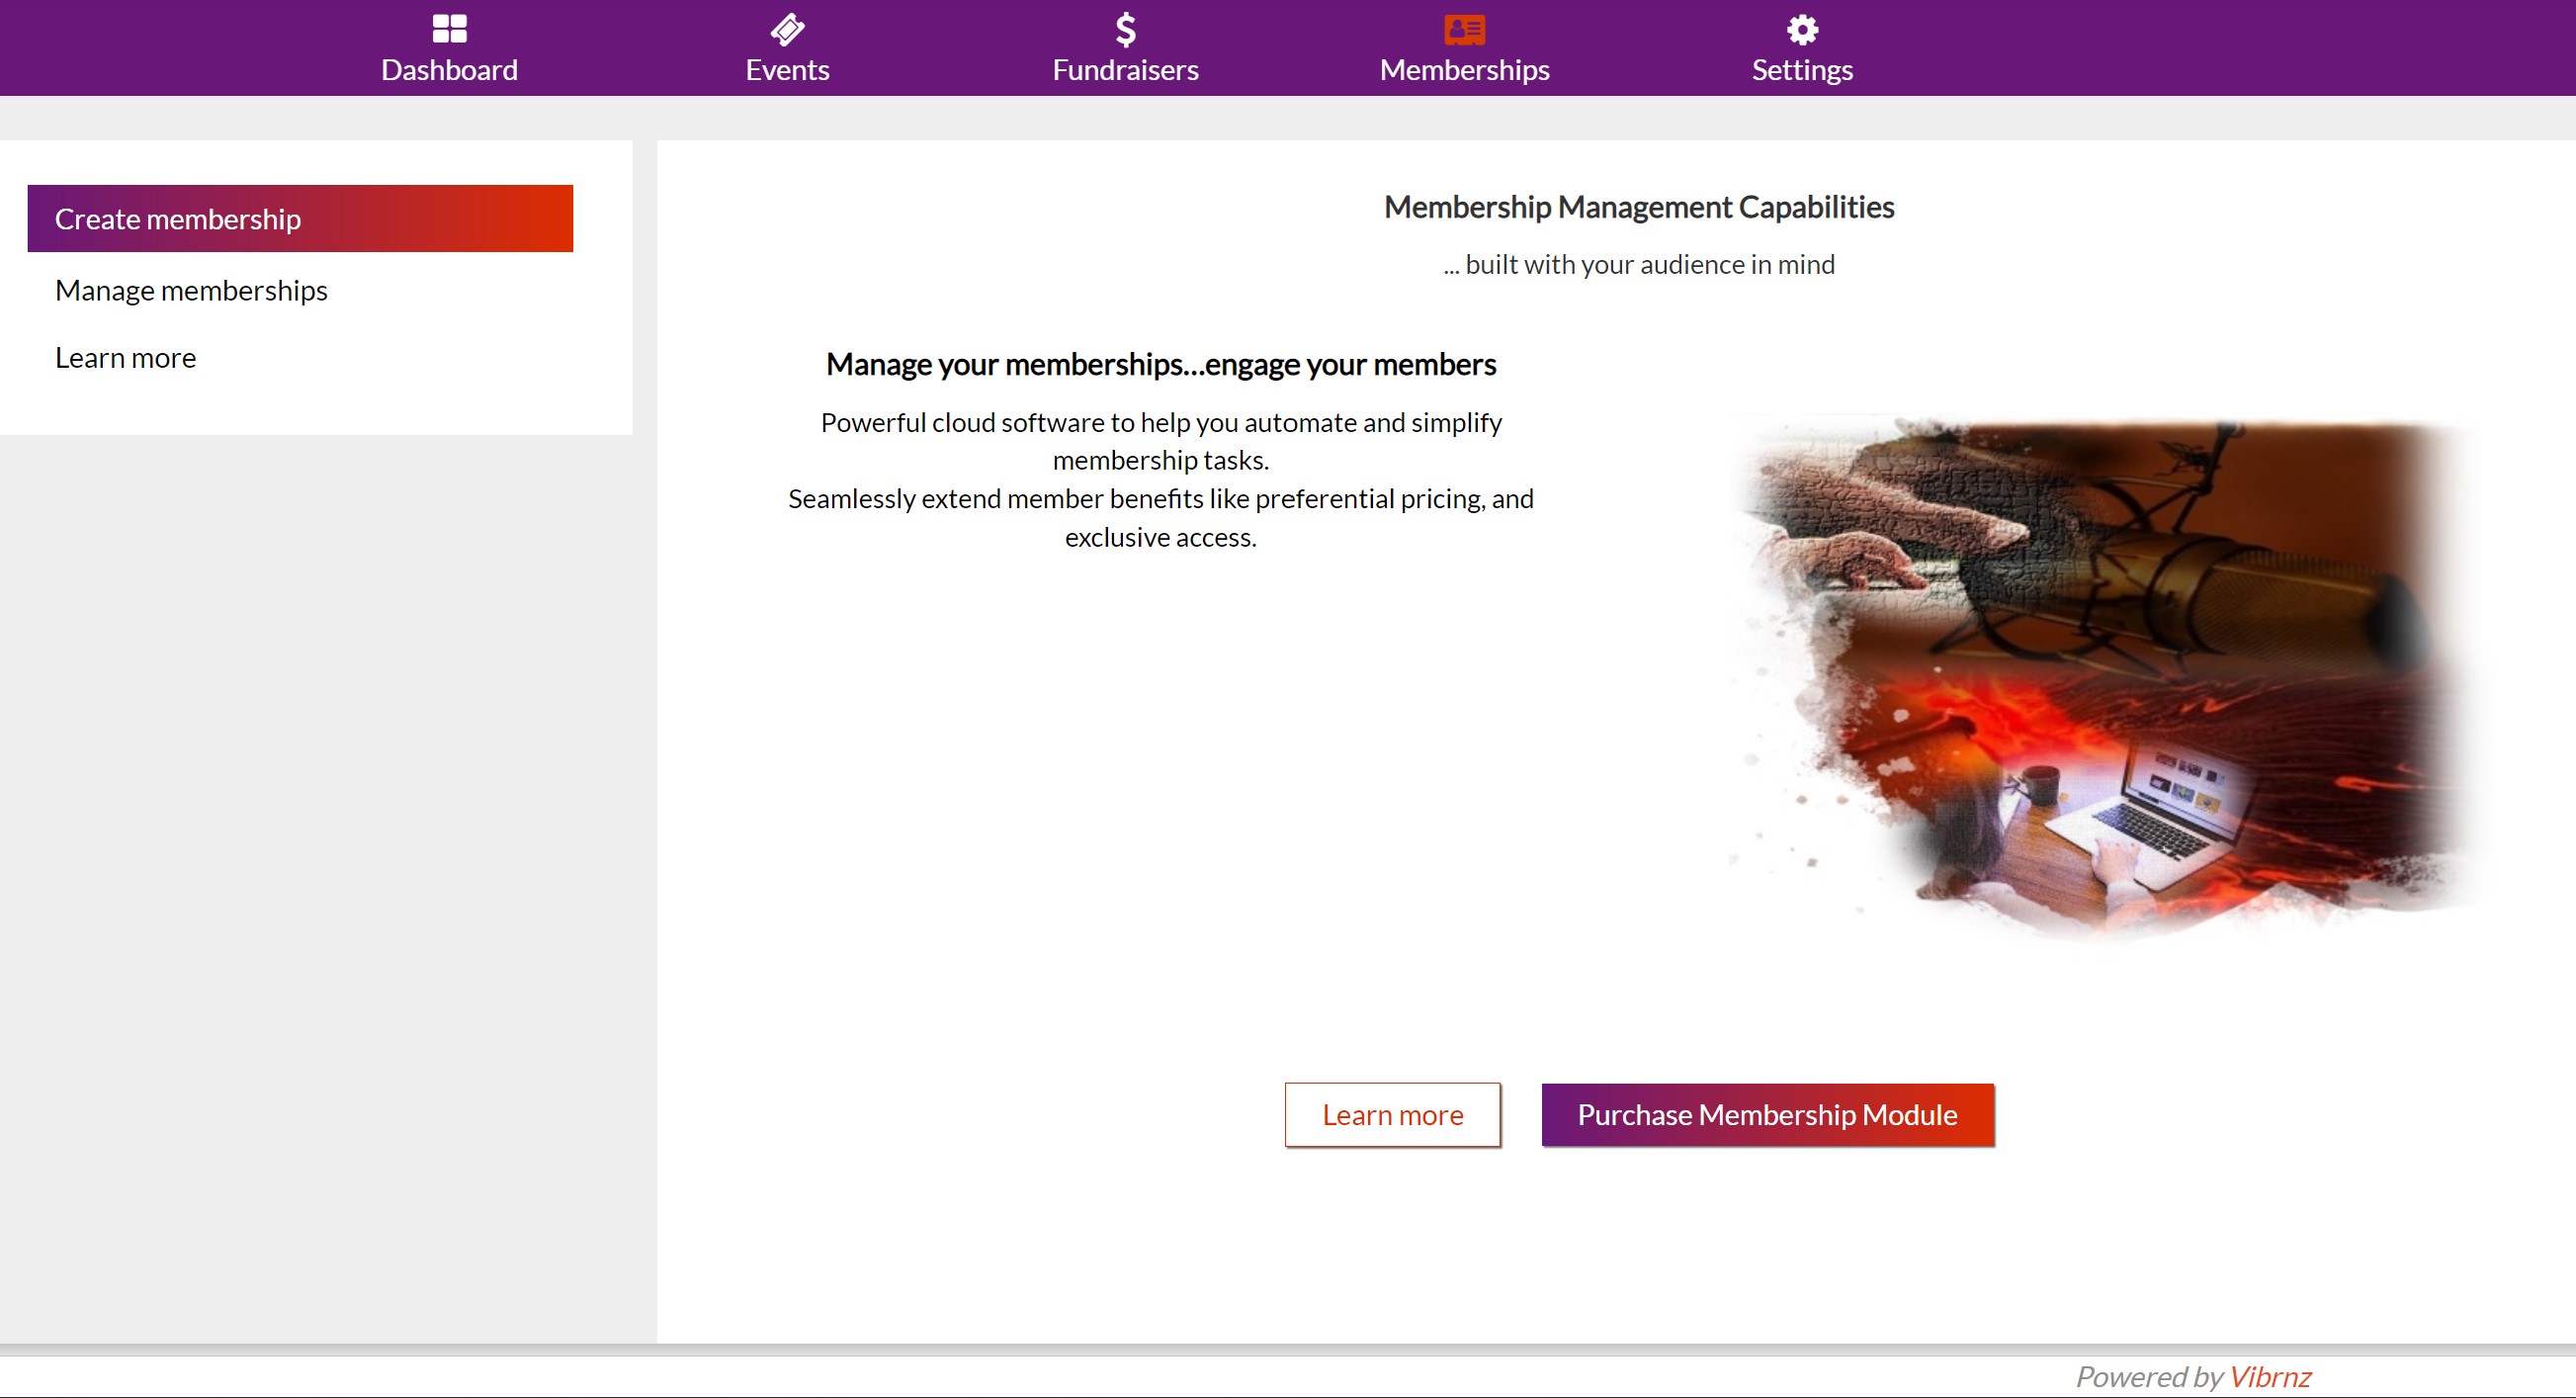
Step 1: Login Vibrnz.com. If you don't have a Vibrnz account, sign up. Once you log in your Vibrnz, dashboard is as below

Step 2. If you are a first time user, you will need to purchase the membership module. Click on "Purchase Membership Module", go to the checkout page and make the payment to get access. (This module is currently being offered for free. Please reach out at info@vibrnz.com for inquiries)
Step 3: Once you have access to the Membership module, to create a new membership form, click on "choose" under the template of your choice. Currently there are two templates available. You can pick one that suits your needs. To view the template click on "Preview".

Step 4: Once you click on "Choose", you are on the "Edit form" page. You can now create and publish a membership form that will help you onboard your members. You can add multiple fields to collect member information. Mark fields as manadatory if you need to. Preview the form at anytime. Once the form is complete, click on Save and Exit.

Create form - Choose Template - Edit form.
Helpful Hint - To avoid interruption while creating the membership form, have the following ready:
1. Banner of size 1210 px by 400 px
2. Your account in Stripe.com. Sign up and create an account. This will allow all the membership proceeds to flow directly to your bank account via Stripe - a global payment processing platform.
Edit form looks like below. Fields to fill:
1. Add form title: This title will display in the membership form URL.
2. Template is already chosen. If you would like to change to another template, choose from dropdown.
3. Add description: Here you provide a summary about your organization and the memberships you are offering.
4. Add banner: Choose a banner (recommended size 1210 px by 400 px). You can use the banner to showcase your brand.

5. Payments : Give your patrons the option to pay online via credit card or offline via any other modes like check. Our platform allows you the flexibility of accepting payments online or offline and registering your patrons as members. On the form, check the box Accept payments online OR Accept payments offline or both!
Stripe account: So the membership proceeds can go to your bank account directly, make sure your Vibrnz account is linked to Stripe. CURRENT STATUS will tell you if your Vibrnz account is currently linked to Stripe or not. If it is not linked, go to Stripe.com, sign up and create an account. Then click on the button "Click here to link to Stripe" and proceed as instructed.
Accept payments offline: If you choose this option, you can customize a message for your patrons. They can view it on the checkout page. The message could direct your patrons on how to pay. For e.g. if accepting checks, you can add text such as "You can mail the check to..."
Service fee: By default, the service fee is charged to the payer. You have the option to absorb the fee.

6. Promo code : You can create a promo/discount code and offer it to your members for additional benefits. Click on the "Yes" option and then click on the "Edit/View Promo/Discount codes". Now you can generate a new code. Just follow the instructions.


7. Multiple fields on the membership form : You can add multiple fields to your membership form. Name and Email get added automatically. Rest of the fields are optional to be added. If you would like add additional fields to the form, you can use the buttons on the left. For e.g. if you click on "Short text", you can add a field with header "Company name". You can add single and multiple choice buttons. You can also add numeric fields. If you want to make a field mandatory, just click on the checkbox.

8. Customize the membershp id: Use this section to format unique membership ids you would like to generate for your members. You can use the first 4 boxes to add letters of your choice.
9. Send a customized message to your new members: You can share a personalized message and provide any instructions to your new members by typing a message in the box.

10. Membership type: The final section of the form lets you create multiple membership types. Click on "Add membership type" and create multiple membership types. Add a title, describe the benefits (you can use bullet points to list the benefits), membership price (or fees), membership term and maximum number of members that you want to allow withing this membership type. Rolling and Fixed Term memberships:
1. Rolling: By default, every membership type is a Rolling membership. So the membership starts on the day of purchase, and assuming the term is one year, it continues to renew every year until it is cancelled. You can choose to have auto renewals so that a reminder email goes to the member 30 days prior to expiry date.
2. Fixed Term: If your membership term is fixed for e.g. from April 1 to March 31, choose the Fixed Term option, and select a start date. Renewal of this membership is optional.

11. Membership type: You can preview the form at any time by clicking on "Preview".
12. Publishing the Membership form: Once the form is ready, click on save and exit (green button) on the left menu. You will be redirected to the "Unpublished" section. Click on the 3 dots under Actions to view the form if needed and click on publish. Once you click on publish, you can view the form under the "Published" section. If you need to edit the form again, just click on the 3 dots and click on Edit.
Once the form is published, a public URL of the membership form is created.

Public URL: Once the membership form is published, a public URL is generated. This URL can be added to your website. You can create a flier or a membership button and link it to the URL so that when your patrons come to your website, and click on the flier or the button they are redirected to the membership form/page. Note that once the form is submitted and the payment is complete, the member receives a confirmation email with all membership details including the id.
QR Code: To generate a QR code, right click on the published membership webpage/URL and click on "Create QR code for this page". This generates a unique QR code. which can be shared on your fliers, website or any platforms that you are working on.
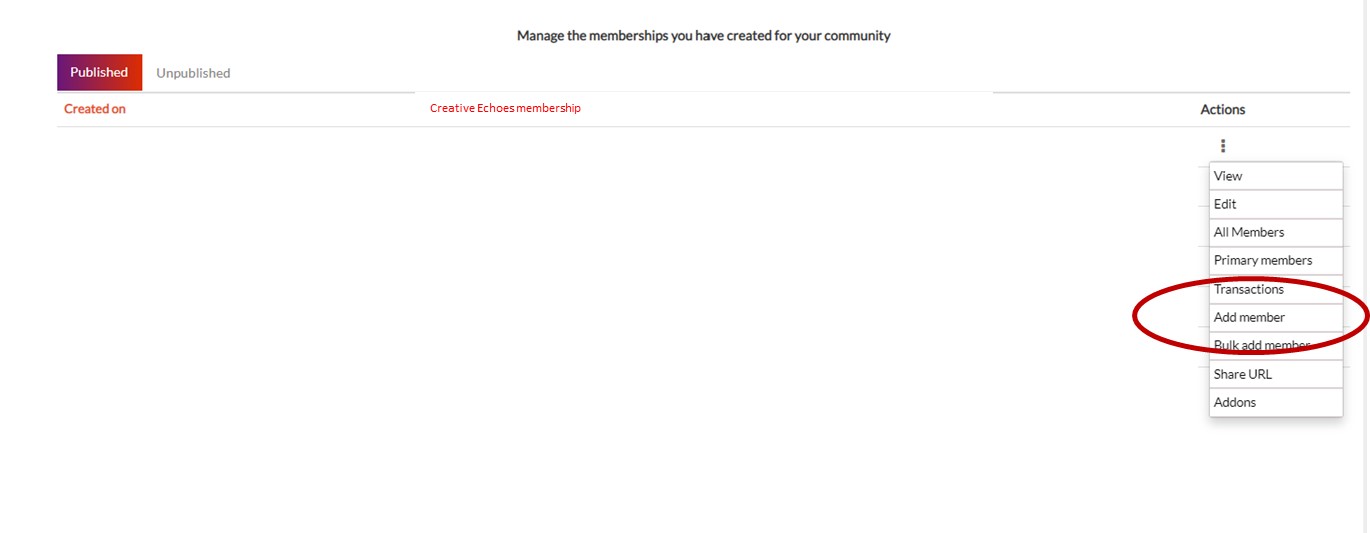
There are three ways to add new members:
Membership form public URL: Your patrons can fill in the membership form published (as shared in the previous steps), make the payment and submit.
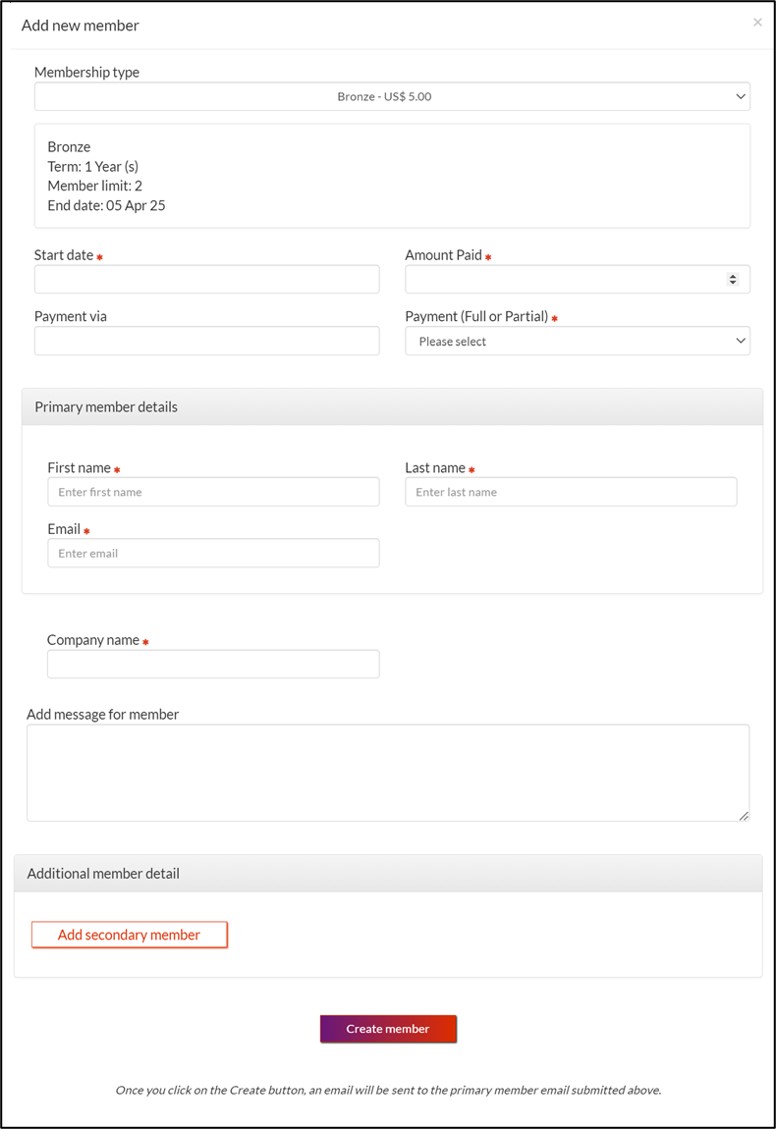
Organizer adds member (one at a time) from admin - membership dashboard: Go to the dashboard, click on the 3 dots, and click on "Add member". Fill up the primary member details, add secondary members if any and create membership. Once you click on the "Create" button, an email goes to the primary member confirming the membership. You have the option of adding a personalized message for the member.
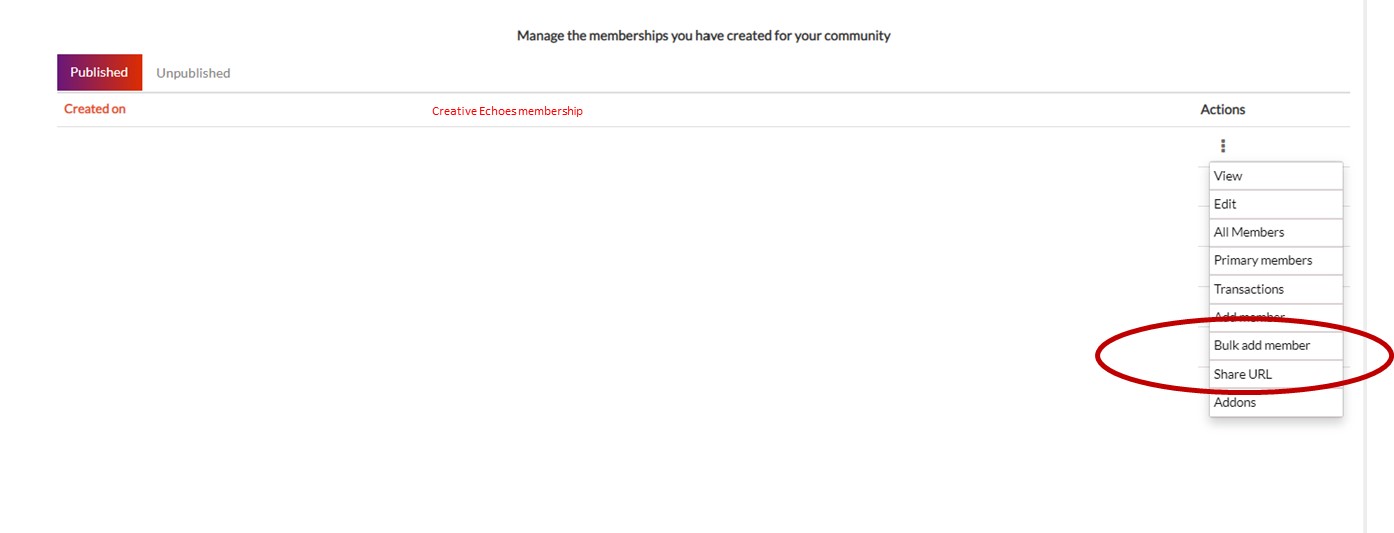
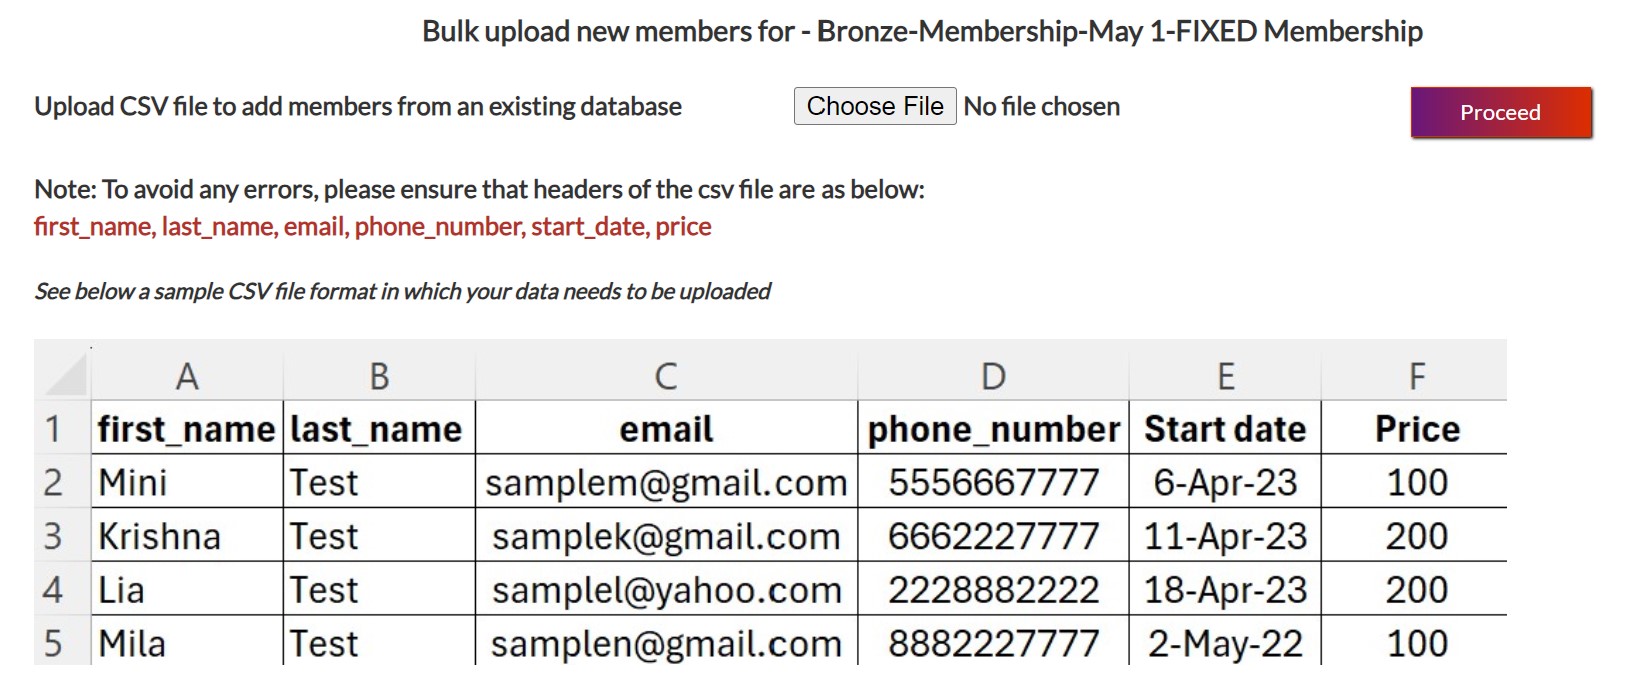
Bulk Upload: You might have a database of members on a different platform. Your existing members do not have to fill up a membership form again. You can bulk upload members and create your member list on Vibrnz with the basic details. This is how it works:
-
Click on "Bulk add member" in the dropdown on the 3 dots
-
On the Bulk upload page, click on "Choose file". Ensure that it is a CSV file and follows the format shared on the page.
-
Once the file is chosen, click on "Proceed".
-
This will upload the basic details of all the records. Note that you can upload only upto 500 records at one time.
-
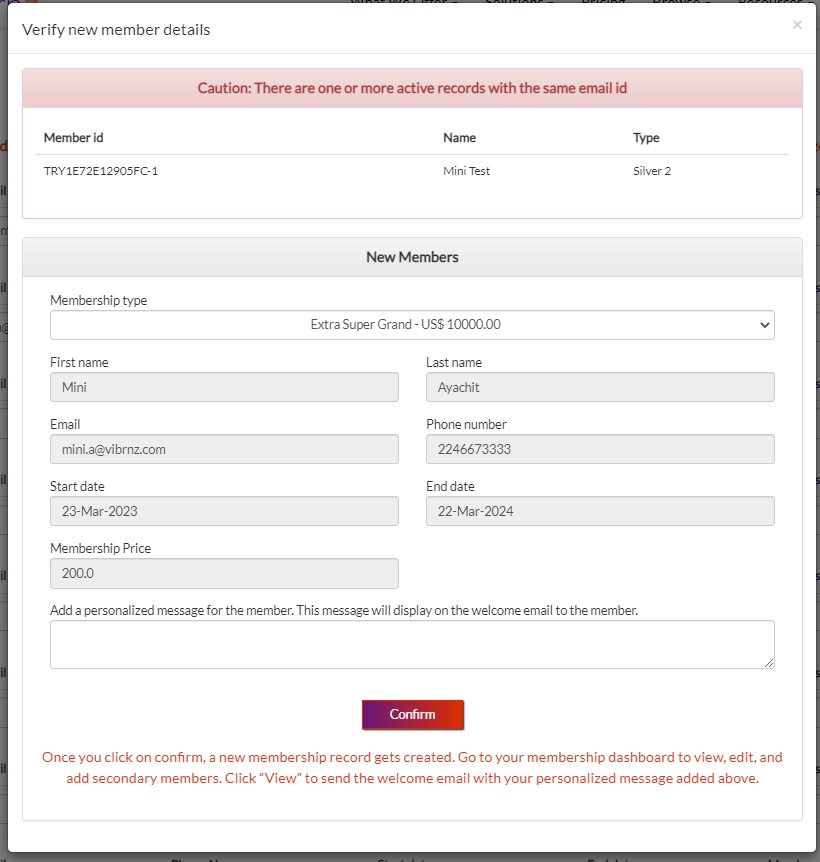
Verify each record to ensure all the information uploaded is correct. When you click on Verify, it will show you the saved record. Here you can add a personalized message for the member. This message will display on the welcome email. Verify creates a member record but does NOT send a welcome message to the member. To send the welcome message or to edit member details, read the next tab ("Edit member and Welcome")

-
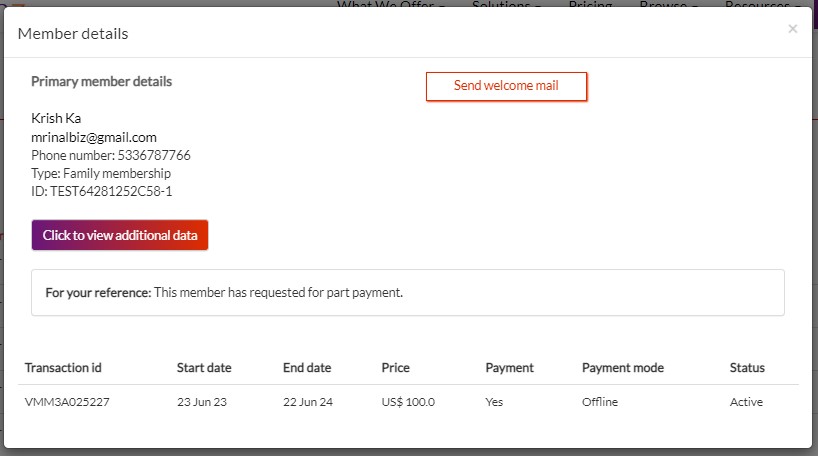
Once a record is created, you can view the record in the "All members report" on your dashboard. You can view, or edit the record here at any time. If it is a new member record, you can send the welcome email by clicking on the "Send welcome email" button (shown below). You can click

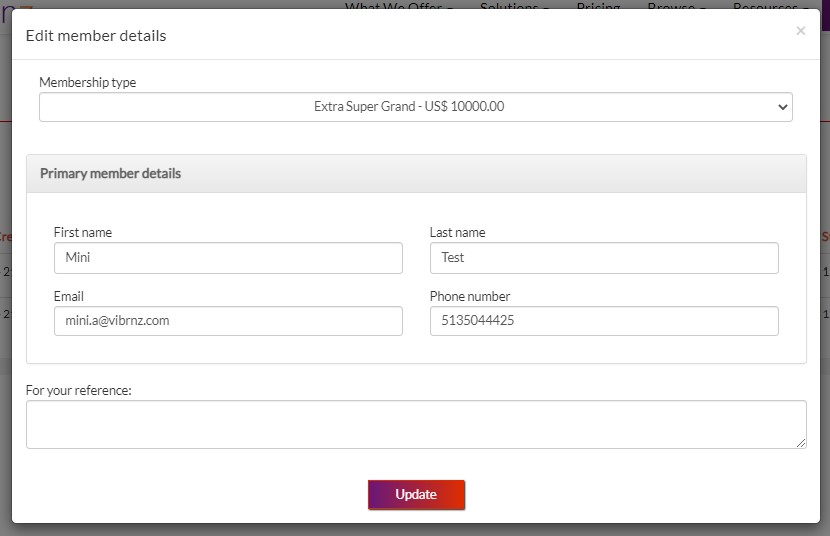
Edit Member details: Both the organizer and the member can edit member profile/details.
Organizer:
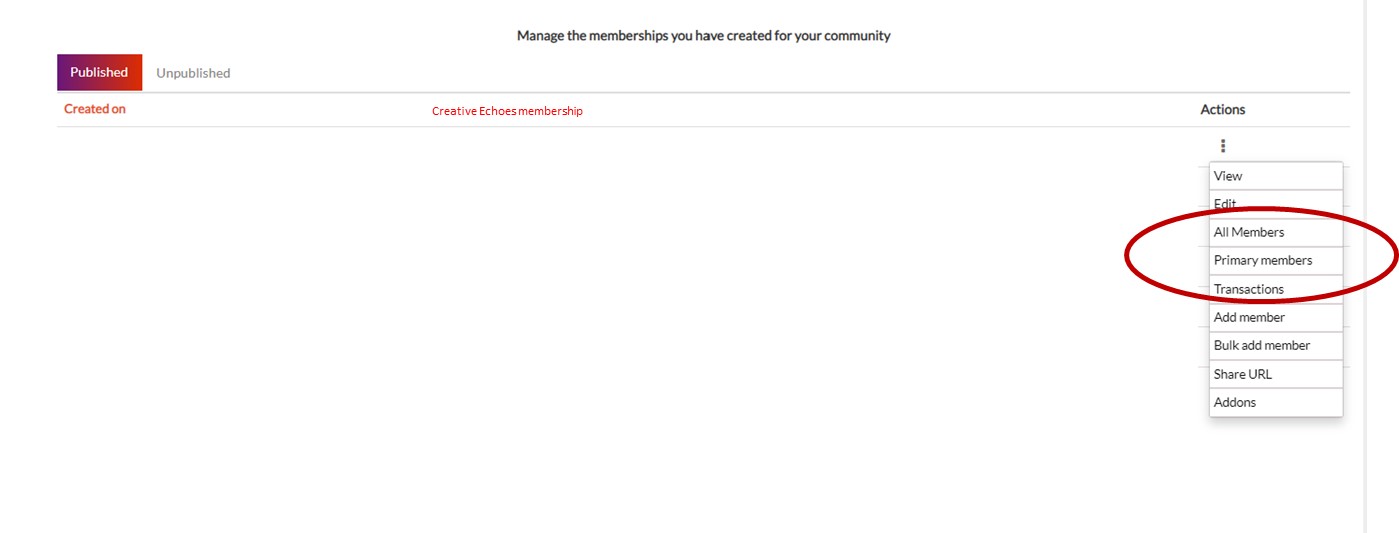
Go to your membership dashboard, click on the 3 dots, and from dropdown select "All members".
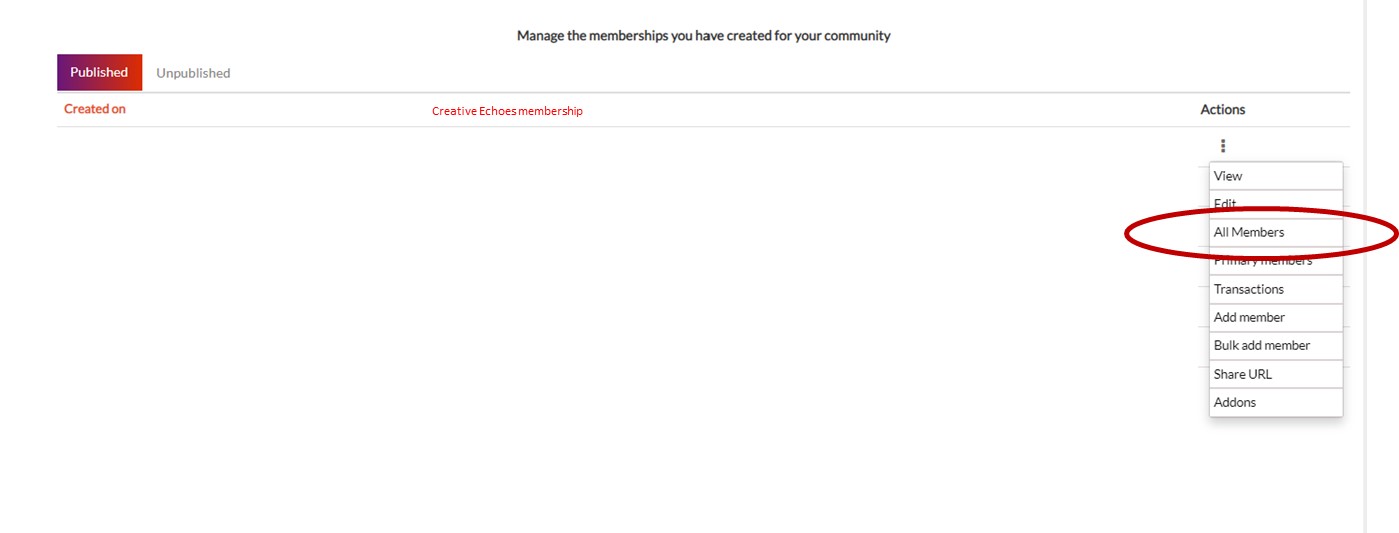
The "All members" report provides you details about all your primary and secondary members - name, member id, email, membership type, start and end date. Click on the 3 dots against a member record and you will be able to view or edit the member details.

You can upgrade or downgrade membership level, as shown below. You can also add a message for your own reference.
Member:
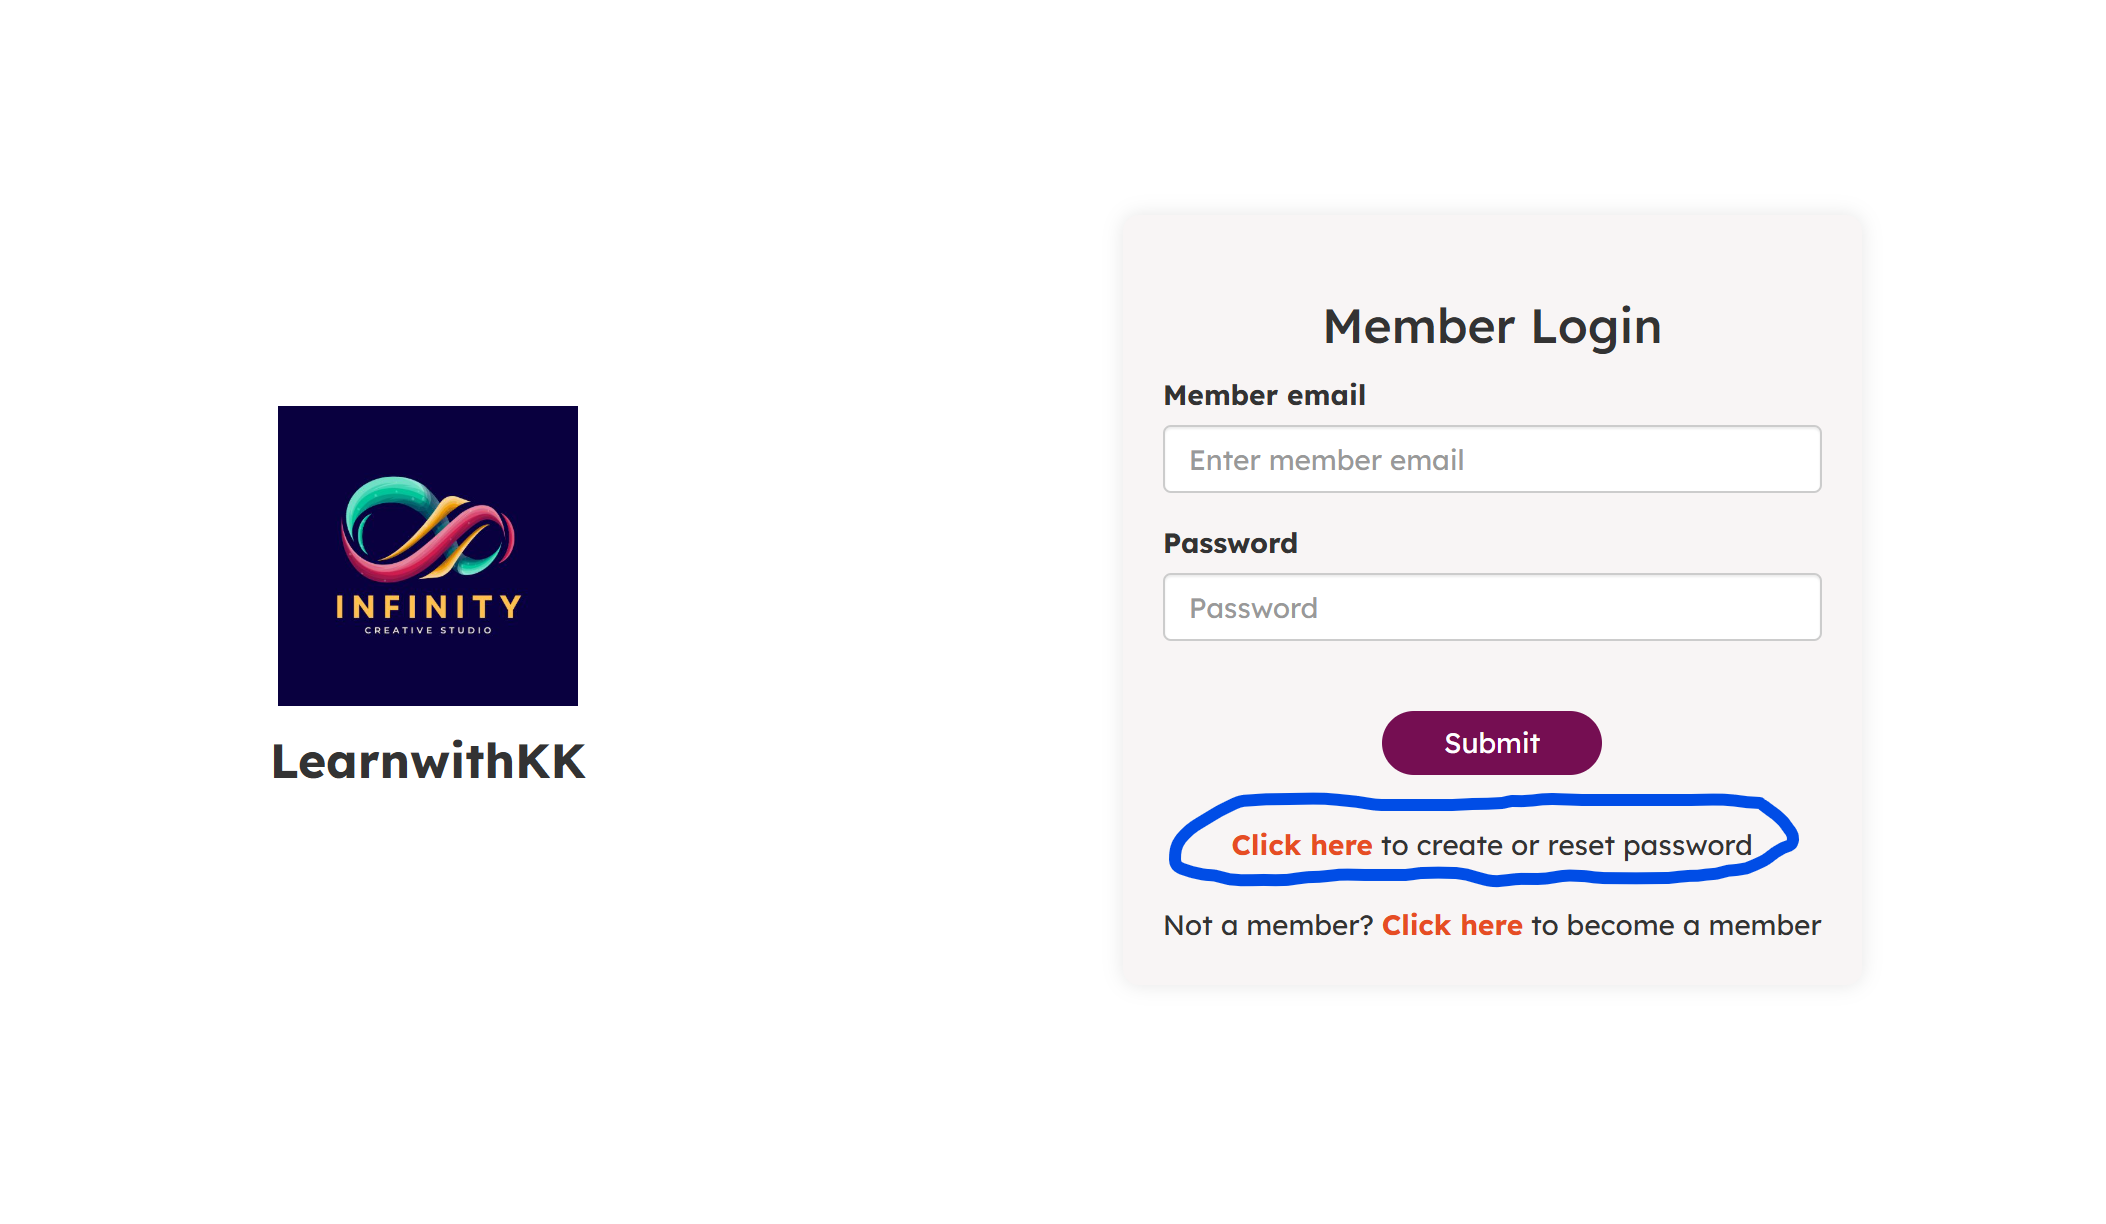
Member Login Page: Primary member can go to the login page (as shown below). If the member is new to this page, they can use their primary registered email to create a password and access the member account.
Membership data:
This is the most important component of your member management module where you collect and analyse all the membership data. You can view reports online and download in excel. The following member reports are currently available:
-
All members
-
Primary members
-
Transactions
All members: This report provides the details of ALL the members including primary and secondary. You can use this report to view membership details of each member, edit, or to add secondary members. You can sort the report by member id, name, email or membership type. It will also tell you which memberships are active, which members are added manually by the organizer and which ones have been created by the users themselves.
Primary members: This report displays the list of only primary members in the database.
Transactions: This report provides details of all the transactions made via the membership module. It captures whether the payment is made online via Vibrnz or collected offline, the breakup of the service fees paid. Note that the this captures only the service fee that is charged if the payment is made via Vibrnz. Any service or platform fees which is charged separately for manual and offline transactions are not captured here.
For Rolling memberships:
Rolling memberships get renewed year after year. Based on membership settings, members receive an automated renewal email 30 days prior to membership expiry. The member can renew the membership anytime within this period. Beyond 30 days, the membership gets cancelled and the status against that member shows as "inactive" in the "All members" report.
The organizer has the option to send renewal email at any point from the "Primary members" report. Clicking on "Send renewal email" triggers an email to the member with all the membership details and the payment link. The member can make the payment and renew her or his membership.

For Fixed memberships:
Fixed memberships are created for a fixed period of time. For e.g. if created for 1 year period, all memberships will expire after a 1 year period unless the organizer manually extends the membership by another 1 year. After the new membership period is created in the membership edit form, Organizer can then manually send out renewal emails to all the existing members.
The organizer has the option to send renewal email at any point from the "Primary members" report. Clicking on "Send renewal email" triggers an email to the member with all the membership details and the payment link. The member can make the payment and renew her or his membership.
Member Portal:
Members can log into their Member portal, go to "Memberships" and renew their membership as below. Steps include:
Review current membership details>>click on "Pay now" and proceed OR member can choose a different membership type (from the current one) and click on "Pay now" to make the payment and confirm membership for the new period.

This is a great marketing tool to increase your memberships. You can provide discount codes to your prospects and allow them to join at a lower fee for the first year. At the time of renewal, the system will generate the renewal at the original membership price.
View and copy Discount code: Go to your membership dashboard, click on the 3 dots, and choose "Add-ons" from the dropdown to view and copy the discount code.

Create Discount code: You can create the promo/discount code in your membership edit form. Just go to tab "Create form" of this page and scroll down to #6 to learn more.
Our capability to integrate Membership with Events is a great tool used by multiple organizations. In addition to event ticketing, registrations, online payments and other event features, our events toolbox allows you to issue free tickets to your members, incentivize them with membership benefits that help you retain them for a lifetime. You can uniquely link each membership to each ticket level and provide restricted as well as free ticketing.
Here is how the integration works:
-
Create your event (for more on event capabilities, refer to our Events Toolbox page)
-
Go to your events dashboard, click on the 3 dots next to your published event, and choose "Extras" from the dropdown
-
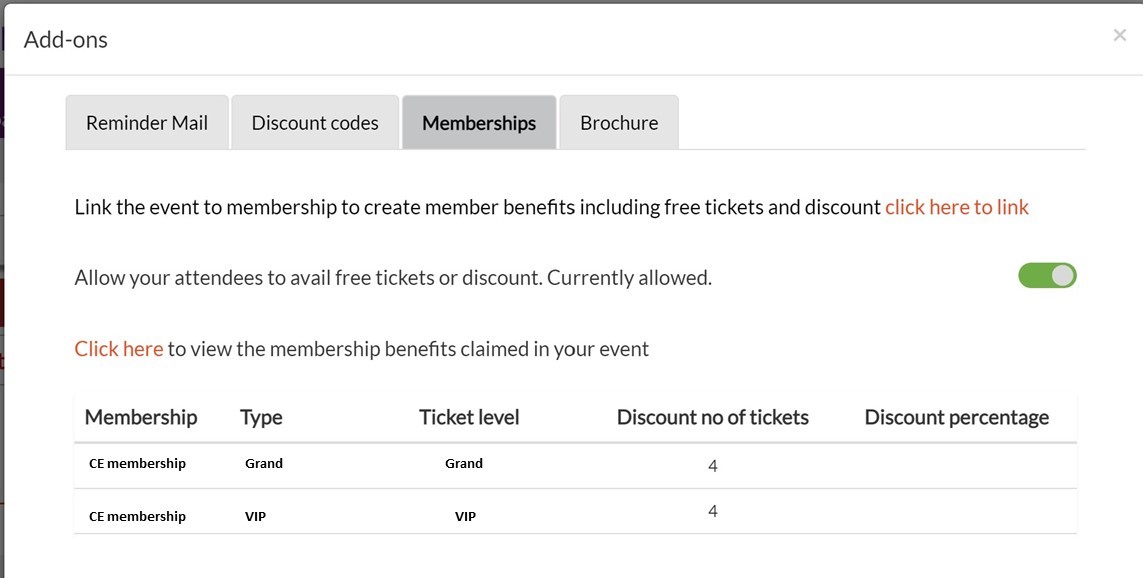
In Extras, choose tab "Memberships". This allows you to integrate your event with your Membership module. The two modules can be linked at multiple levels. Multiple membership types could be linked to a single or multuple ticket levels. Click on "Click here to link"
-
Click on "Add new discount" button. In the pop up (Add membership discount), select the membership form from the dropdown. Then select the member ship type followed by the ticket levels that need to be linked to membership type for free tickets or discount.

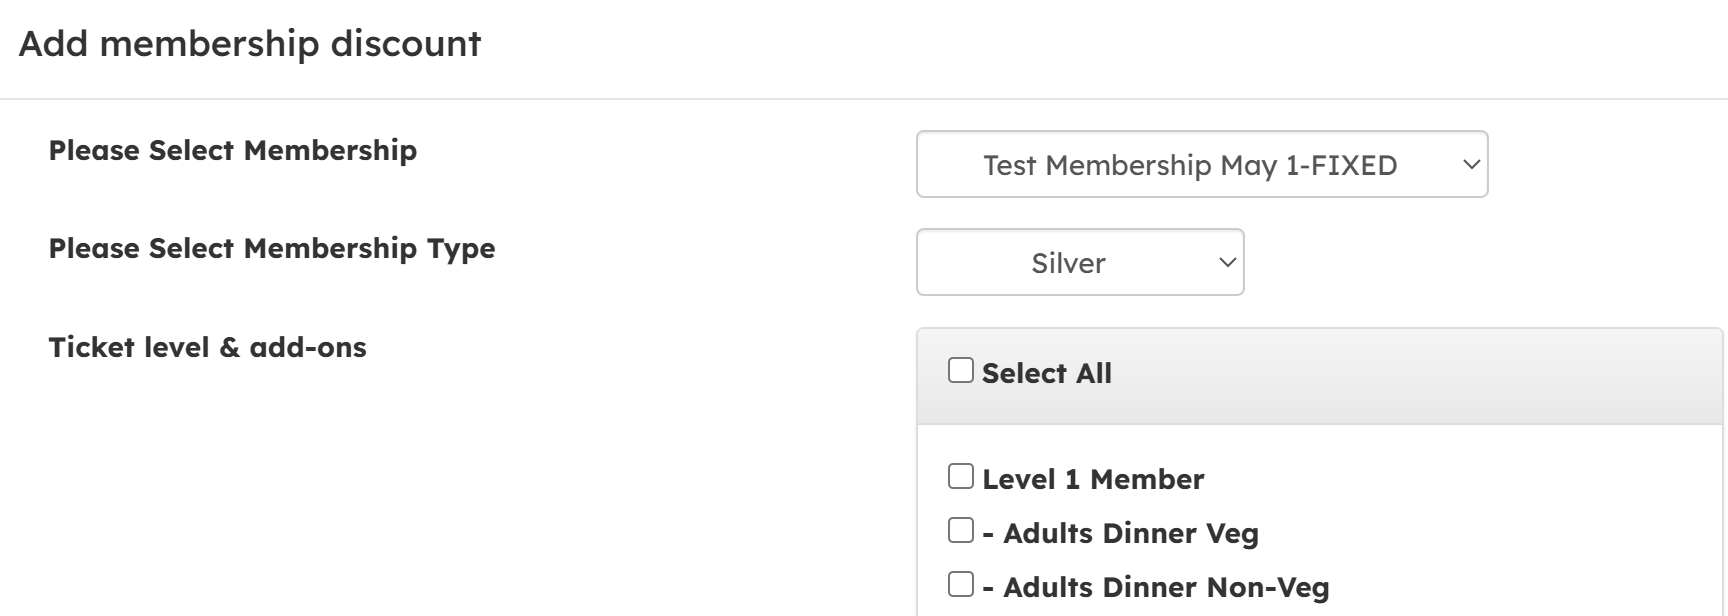
Scroll down the pop up - Towards the bottom, add the maximum no. of free tickets allowed for each membership type. You can limit the no. of free tickets that any member can purchase by checking the box (Check box to apply the limit).

-
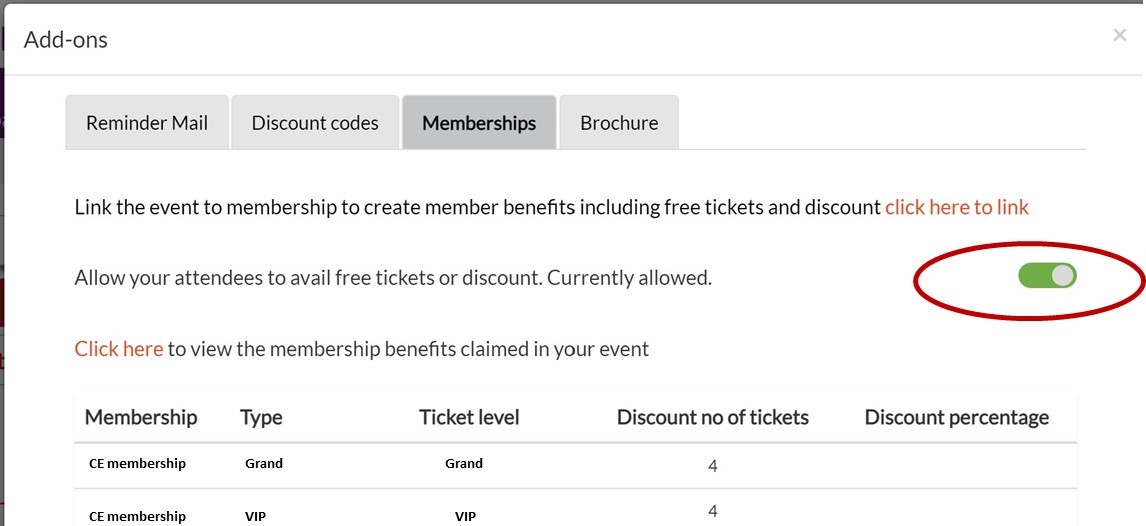
To ensure your members can verify their membership on the checkout page and avail the free or discounted ticket benefit, keep the toggle button on (green). If you create membership discounts, and do not "ON" the toggle button, members will not be able to make use of this feature.
-
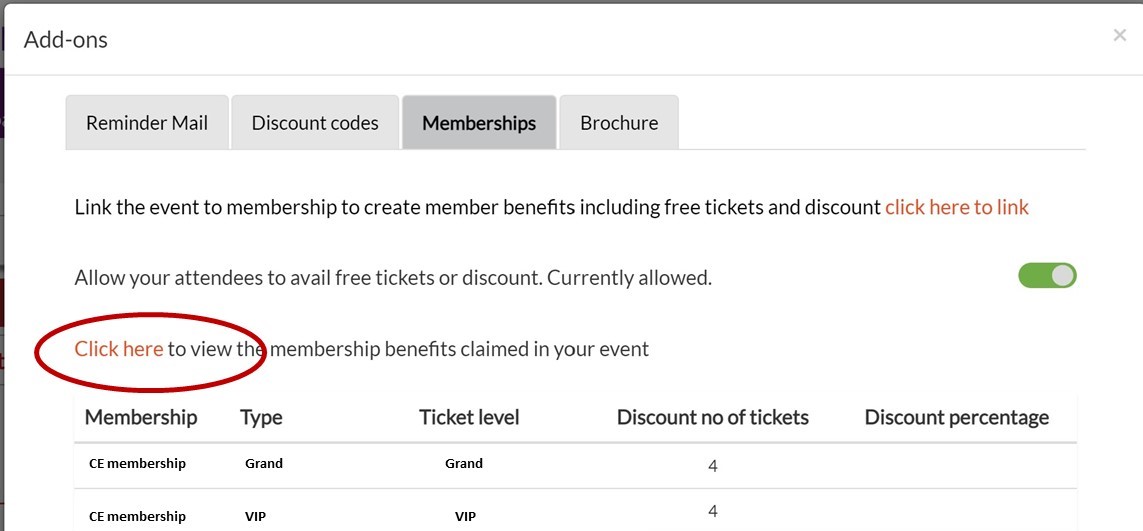
At any point, you can view the free tickets claimed by your members. "Click here" opens a claims report displaying all the details.
-
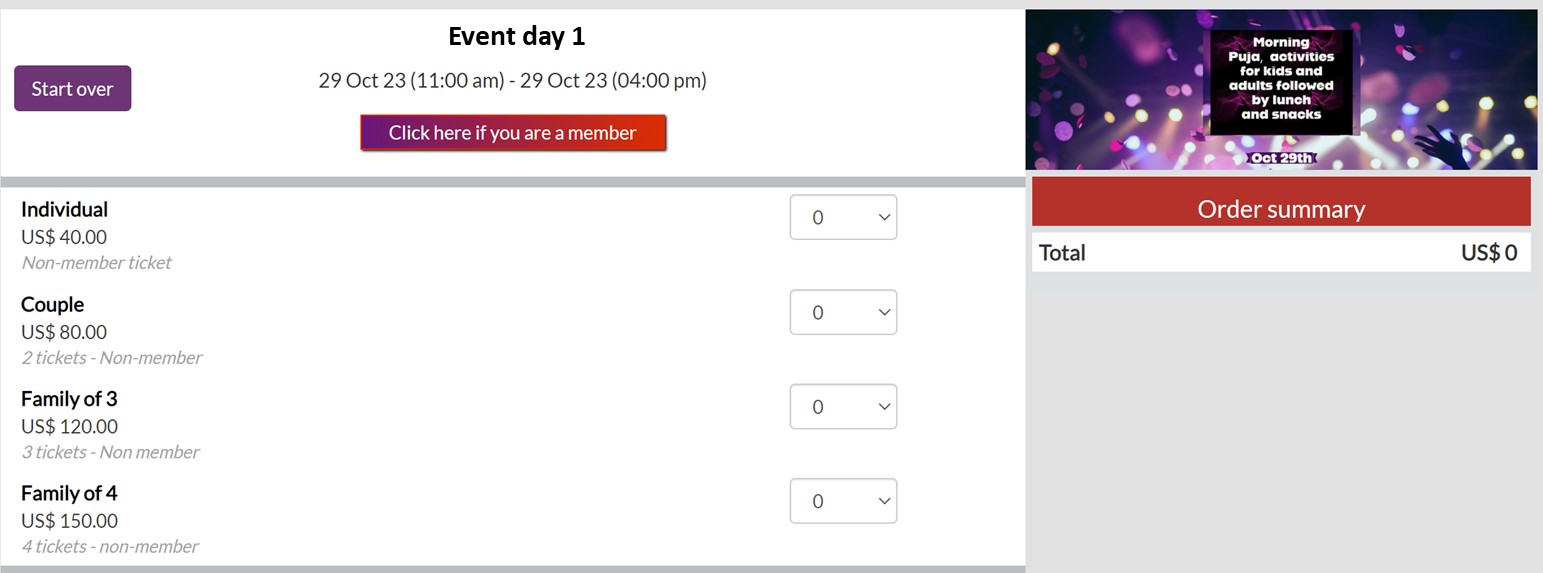
Once the membership and ticket levels are linked, here is how it is displayed on the checkout page. Member verifies the membership, avails the discount and goes to the payment page to close the transaction.
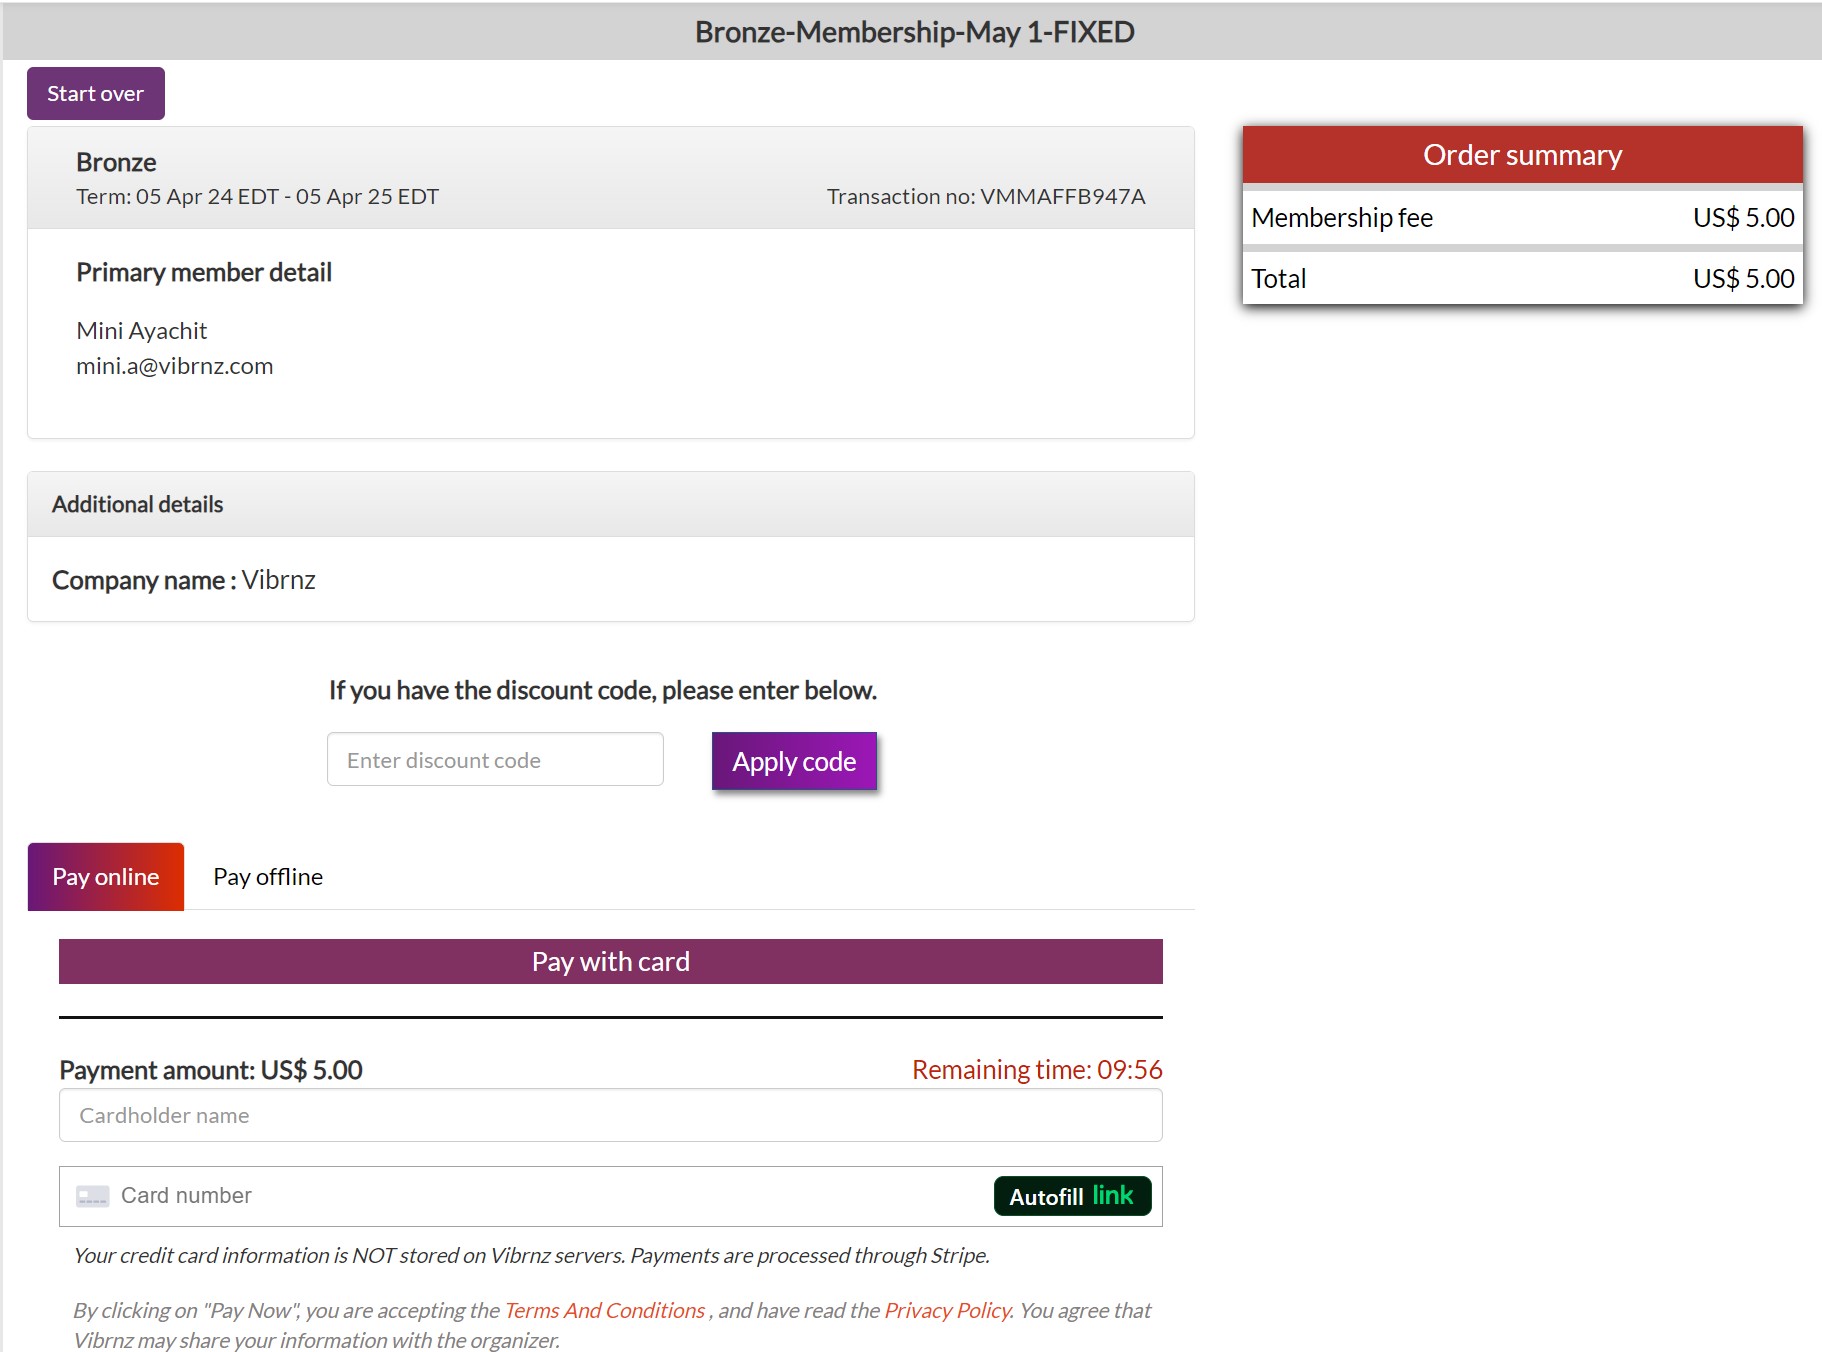
Payments for Memberships can be collected online via the Vibrnz platform or offline (via check, zelle or any mode of payment acceptable to you).
Pay online: If the members choose to pay online as below, once the transaction is completed, they receive a confirmation with all the membership details, and their membership is activated immediately.
Pay offline: If users choose the Pay offline option as below, they can view the message from the organizer on how to make the payment offline, click on submit.
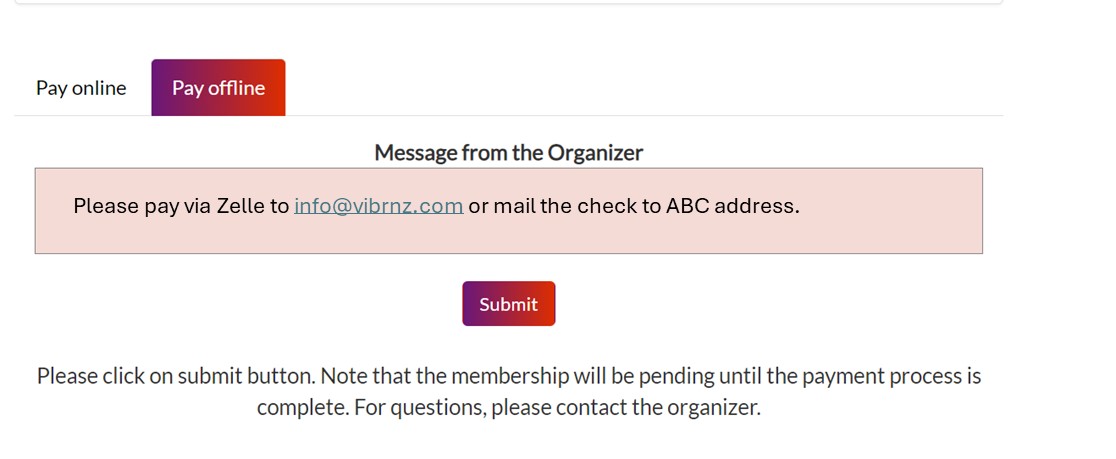
Once the user clicks on submit, the organizer receives an email message regarding the membership offline request. Steps to follow to confirm membership:
Go to Membership Dashboard>>3 dots>>Transactions report
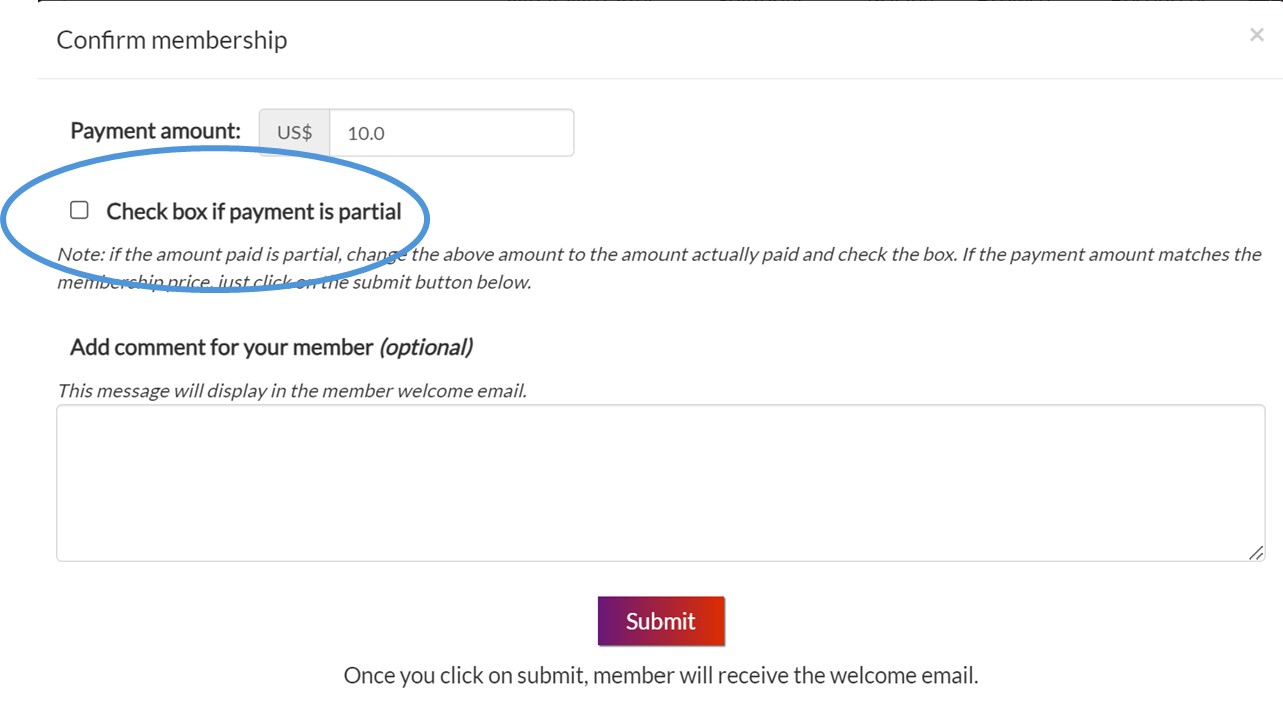
Transactions report>>user record>>Confirm membership

Review the amount received, ensure the amount received is correct and click on Confirm membership. This gves you the option to choose if the payment made is full or partial. Accordingly check the box and submit. Once submitted the user gets an email with the membership details, and gets activated as a member.
Note: For offline payments the organizer will be charged the regular per transaction Vibrnz fees. There will be no Stripe fees.
Your members might make a partial payment in certain scenarios for e.g. company matching contribution. While the member is waiting for the company to match the payment, the member might make a partial payment (possible only with Pay offline option). In that case the member chooses the Pay offline option to make the partial payment.
How to record partial payment?
Go to 3 dots>>Transactions>>Confirm payment
While confirming the member payment, enter the payment amount that is actually paid by the member and check the box as under. Add a message for your member (It will reflect in the email received by the member). Once you click on submit, a welcome email goes to the member.
In the All Members reports, the payment gets recorded as partial. Once the pending payment is received, the new payment is recorded, and the total payment is checked as completed.
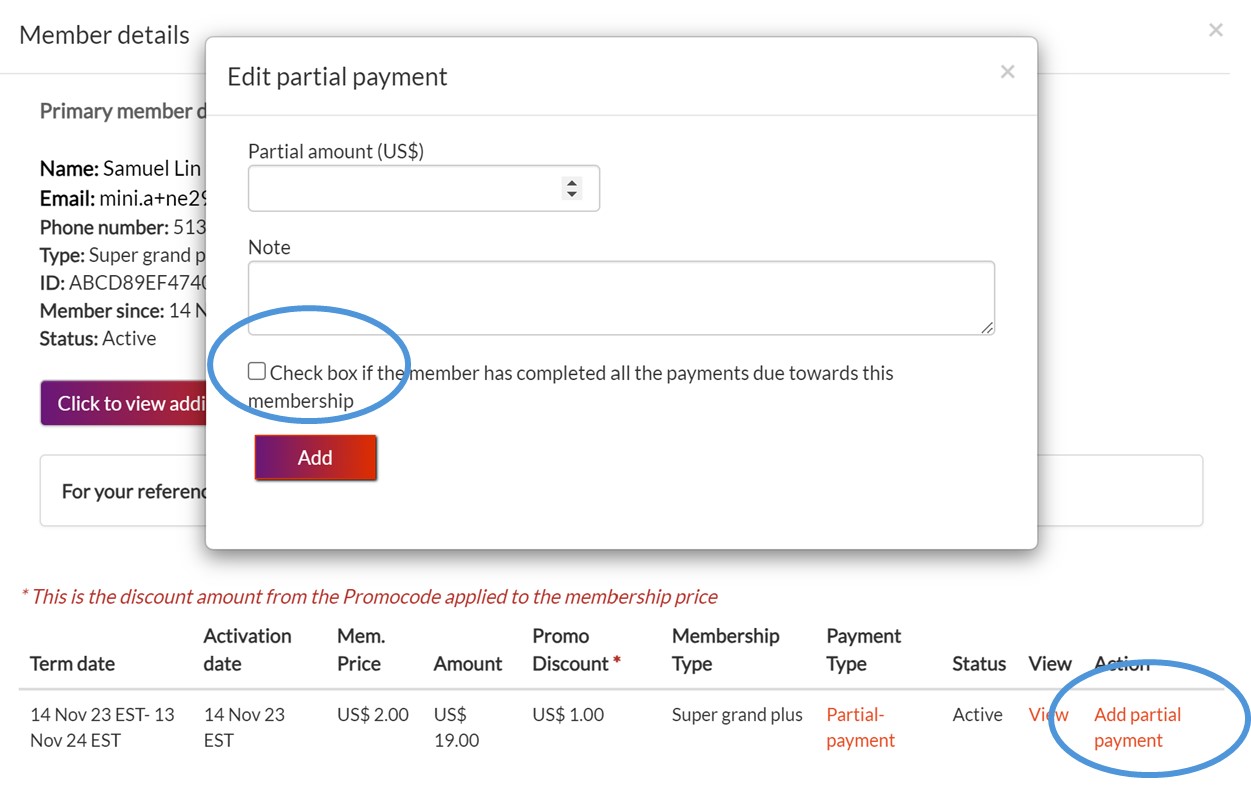
Once the payment is received in full, how to update the payment record?
Go to 3 dots>>All members>>View>>Add partial payment (as shown below)
Add partial payment: This will open a pop up where you can enter the pending amount received. Add a note for your own reference, and check the box if the payment is received in full. Click on Add. If payment is NOT received in full, do not check the box. That will record another partial payment.
Click on "View" to view details of all payments made. Click on Payment type to update Payment status from Partial to Partial-Completed.
Member Portal
Your members can now log into your organization's member portal using the login page as below. Once you create a membership form, an Member login page gets generated that can be used as your member hub.

Once a member of your organization, your members can log into the member portal using their primary member email. This login page will have your organization's logo and name. Once members login, via the dashboard (as shown below), they can navigate to different sections:
Account settings: To edit primary member profile, update name etc.
Memberships: To edit secondary member details and renew membership
Transactions: To review the transaction records for any purchases made for even tickets or memberships (related to your organization)
Event tickets: This allows your members to retrieve tickets and any other details regarding their ticket purchase.
